Are you looking to sell to real-time customers? The need for real-time 3D assets in games, Virtual Reality, architecture, and other GPU-powered markets has seen significant growth recently.
Games aren’t the only things being made in game engines anymore– in no small part due to the advancements made with real-time engines. The Unreal engine is emerging as a first choice for those creating VR at the highest end of visual fidelity for platforms like Oculus Rift and HTC Vive. Meanwhile, the Unity engine– long a favorite in the mobile space– has established itself as the platform of choice for cutting-edge AR platforms like Microsoft Hololens and Meta 2. Real-time unlocks the unique ability to interact with scenes and quickly develop and redesign entire environments on the fly without the need to re-render, a capability that’s proving invaluable to more and more industries.
[/vc_column][/vc_row][vc_row padding_top=”0px” padding_bottom=”0px”][vc_column fade_animation_offset=”45px” width=”1/1″]Regardless of industry, one of the biggest questions these customers have when browsing through TurboSquid is whether the model that they see on the screen will properly translate to, or even work, in the engine they’re using. As an artist, you have a lot of ways to answer that question in your description and images, but few things make it more clear that your art works in an engine than showing your content in the engine itself.
Real-time game engines are simply applications for creating 3D worlds in a manner that will be familiar to any user of Max, Maya, or other non-real-time 3D app. There are many engines that fill all kinds of roles, but the most prevalent and versatile of these are Unity and Unreal. Getting set up in either one of these (or both) is both simple and free! If you’ve exported your model properly, pulling it into the editor and testing it just takes a few minutes once you go through the setup process. It may look daunting at first, but we can help you get started.
[/vc_column][/vc_row][vc_row padding_top=”0px” padding_bottom=”0px”][vc_column fade_animation_offset=”45px” width=”1/1″]Unity
[/vc_column][/vc_row][vc_row padding_top=”0px” padding_bottom=”0px”][vc_column fade_animation_offset=”45px” width=”1/2″]Unity has documentation for getting started with using the editor. If you’re just testing your models, you only need a basic understanding of how to open a scene and navigate in the editor.
If you have a basic understanding of Unity already, here are Unity’s recommended practices on model I/O:
[/vc_column][vc_column fade_animation_offset=”45px” width=”1/2″] [vc_btn title=”Download Unity” align=”center” link=”url:https%3A%2F%2Funity3d.com%2F||” button_block=”true”][/vc_column][/vc_row][vc_row padding_top=”0px” padding_bottom=”0px”][vc_column fade_animation_offset=”45px” width=”1/1″]
On top of the basic project, I also recommend picking up their shader calibration scene. It comes prepackaged with a great test scene and the basic package for simple asset analytics, as well as engine-specific shader calibration charts and material samples. If you want to optimize for Unity down the line, you’ll end up with this in your toolbox either way.
[/vc_column][/vc_row][vc_row padding_top=”0px” padding_bottom=”0px”][vc_column fade_animation_offset=”45px” width=”1/1″]Unreal
[/vc_column][/vc_row][vc_row padding_top=”0px” padding_bottom=”0px”][vc_column fade_animation_offset=”45px” width=”1/2″]Unreal has a great knowledge base and tutorials designed specifically for artists looking to get their models in the engine to test. I recommend following their step-by-step guide.
They also have best practices for FBX export and more generalized content standards for supporting assets like textures:
[/vc_column][vc_column fade_animation_offset=”45px” width=”1/2″]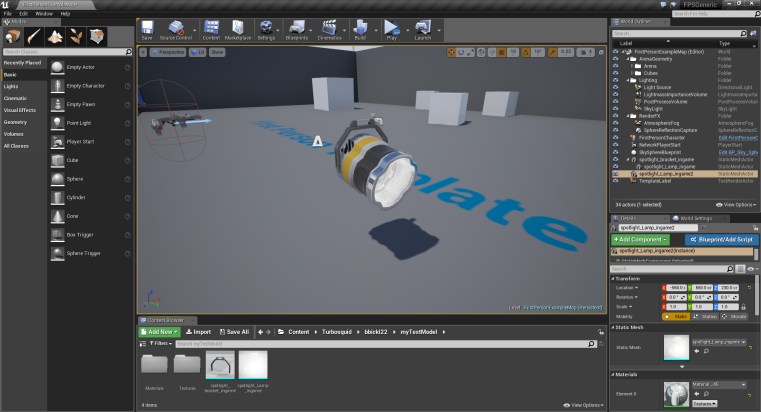 [vc_btn title=”Download Unreal” align=”center” link=”url:https%3A%2F%2Fwww.unrealengine.com%2F||” button_block=”true”][/vc_column][/vc_row][vc_row padding_top=”0px” padding_bottom=”0px”][vc_column fade_animation_offset=”45px” width=”1/1″]
Remember, regardless of which engine you choose (or both), it’s important to convey the fact that you did test it in said engine. You can chose do so something as simple as taking shots of your model in a default scene in the editor, but there’s nothing stopping you from going the extra mile with lighting and post effects, so long as you make it clear that the image was taken in-engine.
[/vc_column][/vc_row][vc_row padding_top=”0px” padding_bottom=”0px”][vc_column fade_animation_offset=”45px” width=”1/2″] [/vc_column][vc_column fade_animation_offset=”45px” width=”1/2″]
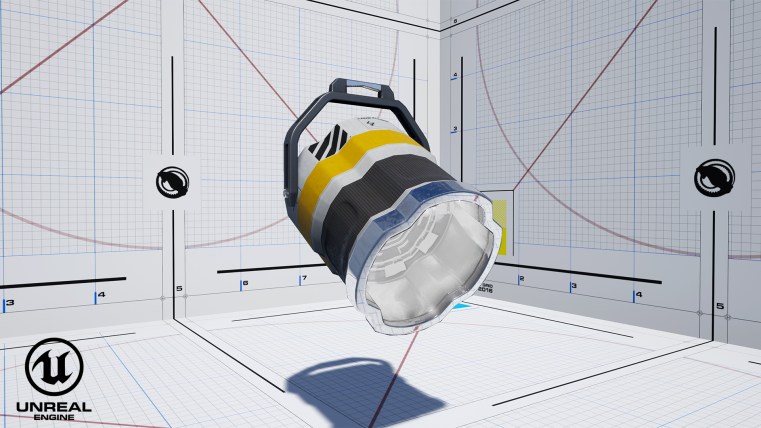 [/vc_column][/vc_row][vc_row padding_top=”0px” padding_bottom=”0px”][vc_column fade_animation_offset=”45px” width=”1/1″]
Taking the time to learn the basics of the platforms that your potential customers use can really help set your models apart. Real-time is a rapidly growing segment of the 3D market, and with a little extra work, you can give potential buyers confidence that your model is going to work for them!
[/vc_column][/vc_row]