While you’re experimenting with Unity, some of you may have come across Mecanim, a state system within Unity that allows the user to control animation states, specify parameters, and create transitions between animations. Below, we’ve put together a basic guide to help you get started within Mecanim, with tips on character and muscle setup for humanoid models.
Asset Preparation & Importation
Importing to Unity
Character Setup for Mecanim
Rigging; Humanoid Character Setup; and Troubleshooting [jump to section]
Muscle Setup
Animation Setup [jump to section]
Asset Preparation & Importation
Before you begin, export your FBX file from your modeling software (Autodesk Maya or 3dsMax). Import your Animation clips from external software with FBX File format using either humanoid (bipedal) type animations or ThirdPersonController animations (for quadrupeds or other characters).
Rigged Character Models should have a specific configuration of bones which are mapped to Unity’s common Avatar format. A Root bone should be added to work with Unity Mecanim. This mapping is stored as an Avatar asset as part of the imported character model, including the bipedal system and skin modifier.
Importing to Unity
Unity accepts a number of 3D file formats, but recommends FBX (2012). The FBX exports the mesh from external software with skeleton hierarchy, normals, textures, and animation. It also re-imports into the 3D software and exports animations without the need of meshes.
Character Setup for Mecanim
Rigging
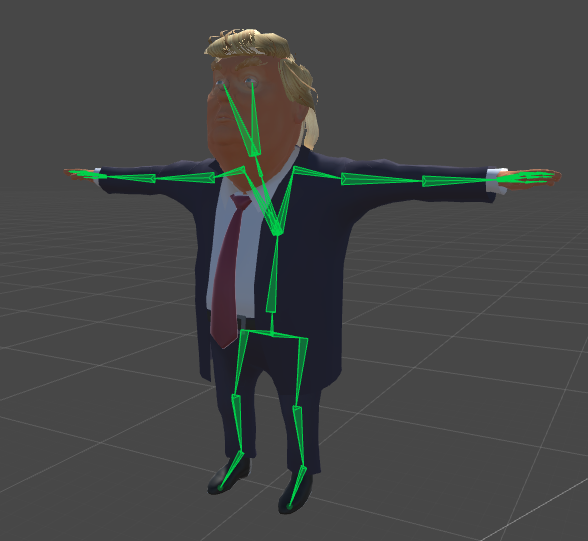
The process of creating a skeleton of joints to control the movements of the model and the bone/root hierarchy should follow a natural structure for the character you are creating. To work with Mecanim, the hips should be the root element of the bone Hierarchy. A minimum of fifteen bones are required for the skeleton.
The process of creating a skeleton of joints to control the movements of the model and the bone/root hierarchy should follow a natural structure for the character you are creating. To work with Mecanim, the hips should be the root element of the bone Hierarchy. A minimum of fifteen bones are required for the skeleton.
Model credit: Denys Almaral
Humanoid Character Setup
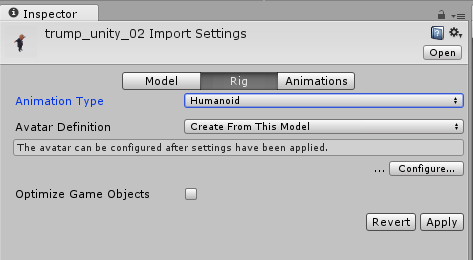
Once the character is imported into Unity, specify what kind of rig the character has. For a biped, the Humanoid Animation type will be the best choice.
Setup will involve the creation and setup of an Avatar and possible tweaking of muscle definition. Unity attempts to connect the imported FBX’s bone structure to the Unity Avatar bone structure. If it succeeds, a check mark will show next to the Configure menu.
The Avatar is added as a sub-asset below the asset (in this case, ‘Trump’ is the Avatar, below trump_unity_02.fbm) in the project view hierarchy.
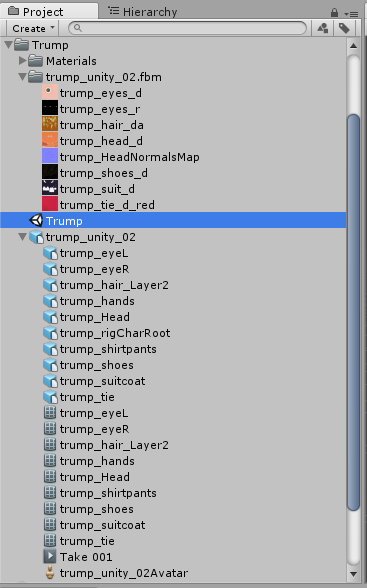
Selecting the avatar sub-asset will bring up the inspector. You can then configure the avatar.
Troubleshooting
If Mecanim was unable to create the Avatar, you will see a cross next to the Configure button, and no Avatar sub-asset will be added. When this happens, you need to configure the avatar manually.
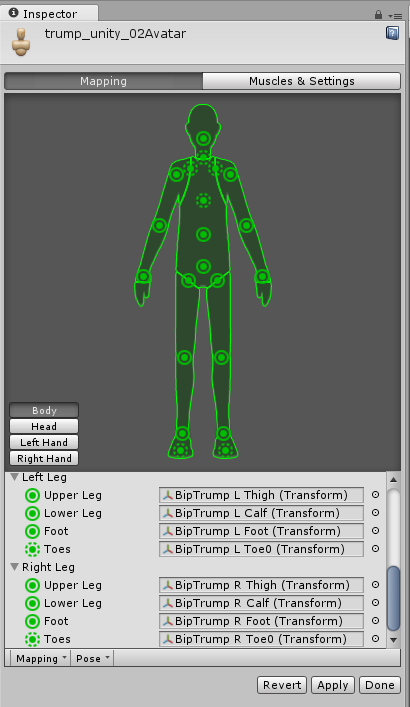
In order to do this, the bone structure will need to match Mecanim’s bone structure and the model MUST be in a T-pose. Fortunately, the inspector will show the necessary bone mapping and will allow you to manually select and target the bones. It shows which of the bones are required and which are optional, though please note that the optional ones can have their movements interpolated automatically. For Mecanim to produce a valid match, your skeleton need only have the required bones in place.
If the model does NOT yield a valid match, you can manually follow a similar process to the one used internally by Mecanim. Sample Bind-pose will attempt to get the model closer to the pose with which it was modelled. Automap will create a bone-mapping from an initial pose. Enforce T-pose which will force the model closer to T-pose, which is the default pose used by Mecanim animations.

Bones can be assigned by either dragging them from the Scene or Hierarchy. If the bone fits, it will show up as green in the Avatar Inspector; otherwise, it will show as red.
If the bone assignment is correct, but the character is not in the correct pose, you will see the message “Character not in T-Pose.” Enforcing the T-Pose or rotating the remaining bones into T-pose can fix that. Save your mapping and continue on to muscle set up.
What about generic character setup?
Retargeting for creatures, animated props, four legged animals is not possible here, but you can still take advantage of the feature sets of Mecanim, such as State Machine Behaviors and Transitions, Asset Creation API (creating animation assets and personalizing tools), and Direct Blending Trees.
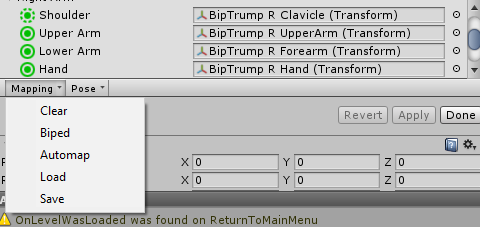
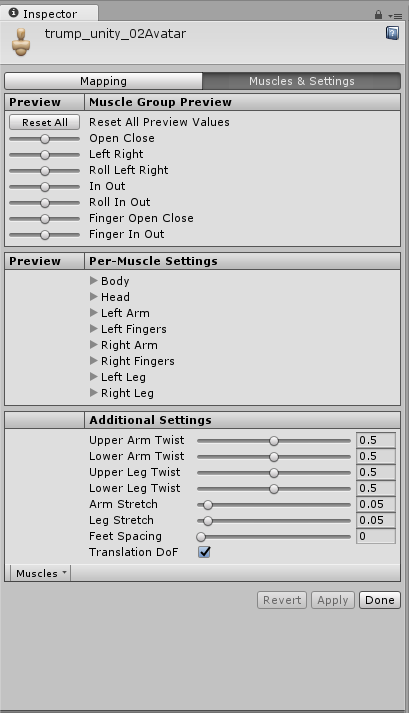
Muscle Setup
Bones can be assigned by either dragging them from the Scene or Hierarchy. If the bone fits, it will show up as green in the Avatar Inspector; otherwise, it will show as red.
Mecanim allows the control of the character’s range of motion. This allows for a lot of character deformations, as you can adjust individual bones in the body, or several at once.
Animation Setup
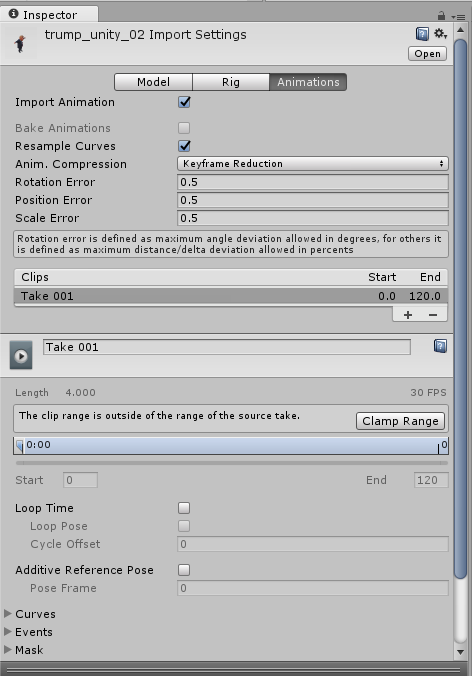
Here, we will set up animation clips with Blend Trees. This base animation system in Unity works with animations clips, which can be selected from imported FBX data.
Clicking on the set of animations will bring up a property window.
Animation Clips are then organized into the Animator Controller, which acts as a “State Machine,” keeping track of which clip should currently be playing and when the animations should change or blend together. A simple Animator Controller might only contain one or two clips, where a more advanced Animator Controller might contain dozens of humanoid animations for all the main character’s actions.
You can blend between multiple clips at the same time to provide a fluid motion as the player moves around the scene. Each of these pieces are brought together on a GameObject via the Animator You can blend between multiple clips at the same time to provide a fluid motion as the player moves around the scene. Each of these pieces are brought together on a GameObject via the Animator Component, which has a reference to an Animator Controller and the Avatar for this model. The Animator Controller also contains the references to the Animation Clips it uses.
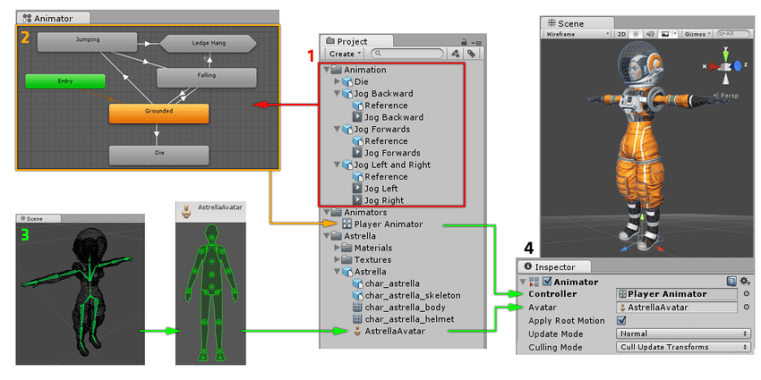
Diagram (credit: Unity) showing how the various parts of the animation system connect together.
This diagram shows the following:
1. The animation clips are imported from an external source.
2. The animation clips are placed and arranged in an Animator Controller. This shows a view of an Animator Controller in the Animator window. The States (which may represent animations or nested sub-state machines) appear as nodes connected by lines.
3. The rigged character model has a specific configuration of bones, which are mapped to Unity’s common Avatar format. This mapping is stored as an Avatar asset as part of the imported character model and also appears in the Project window as shown.
4. When animating the character model, it has an Animator component attached. In the Inspector view shown above, you can see the Animator Component which has both the Animator Controller and the Avatar assigned. The animator uses these together to animate the model. The Avatar reference is only necessary when animating a humanoid character. For other types of animation, only an Animator Controller is required.
TIP:
In the Animation tab, you can set up muscle clips, which are animated muscles and muscle groups. You can also define which body parts each muscle clip gets applied to.Soraya Abtahi assists in the VR Lab at Turbosquid. She is currently a graduate student studying Art Creation at SMU-in-Guildhall, specializing in Character Rigging and Animating. Her passion for bringing characters to life is her inspiration for helping others to study and learn 3D software.