Last Updated: October 29, 2015
Tool Version: v2.009
The PixelSquid Studio is a tool that will prepare your scene with all of the render settings, lights and a camera. This script must be run on each model before submitting to ensure quality. The script creates the stage based on the size of the object, so the script should be run after the geometry is complete, but before the texturing is complete. Textures and Materials will need to be calibrated to match Studio lighting. The Studio tool is compatible up to Max 2016 and V-Ray versions 2 through 3.
NOTE: If the script does not appear to responding correctly or changes made are not visible in render, the scene file may be corrupted. To fix this error, start a new scene and merge in your model. Then prep again using the Studio tool.
Using the script
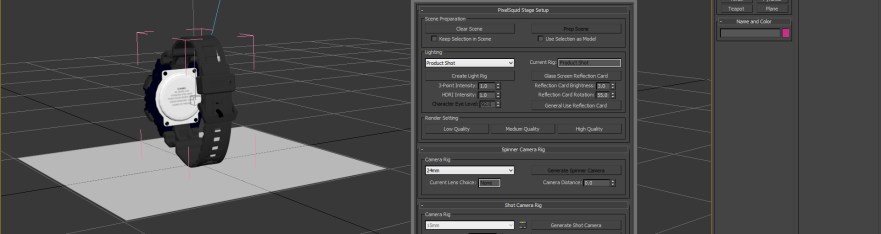
[/vc_column][/vc_row][vc_row][vc_column width=”1/2″]Once the script is installed, you can run the script from the location you chose during installation. When you launch the script, a basic UI will load with a few simple features. For a summarized explanation of below, tool tips appear when hovering the mouse cursor over the UI controls.
[/vc_column][vc_column width=”1/2″]![]()
Scene Preparation
[/vc_column][/vc_row][vc_row][vc_column width=”1/2″]
Clear Scene
Deletes all objects in the scene. Checking on ‘Keep Selection in Scene’, everything but the selection will be deleted.
Prep Scene
Prepares the ground plane, render settings, render elements and grouping for the object. The scene must be prepped before the camera or light rigs can be generated. The size of the ground plane and other options in the script is determined by the size of the object, so the scene should not be prepped until geometry is finalized. Most of the features created are very specific to the rig and must not be edited or renamed. Everything in the scene is taken into account when generating the scene. Check on ‘Use Selection Only’before clicking this button to have the script run on only the selected objects.
If button is locked the UI was open when no objects present in the scene. Close the window and open the UI again after there is object(s) to prep.
NOTE: This is useful when you have an appliance or some object where a small part off the object would offset the rotation of what the main focus is. Example: A kitchen appliance with cord bundled up would have the script run on the object without the cord. Then attach the cord bundle to the HeroObjectGroup. This will give the ideal focus for the main body of the appliance.
Lighting
[/vc_column][/vc_row][vc_row][vc_column width=”1/2″]
Select Light Rig
The drop down menu offers lighting options The different options will change the types of lights, HDRIs, and other lighting settings when generating the light rig. All light rigs may not currently be available. More rigs may become available in future updates.
[/vc_column][vc_column width=”1/2″]
Create Light Rig
The button generates a very specific light rig required for all PixelSquid models. The light rig is dependent on the size of the model and should be generated after the scene has been prepped. The position, settings and textures used by the lights should not be edited. The lights will automatically reference the HDR maps and light map textures provided in the download. An environment background will be applied automatically for each light rig.
Current Rig
This box displays the light rig choice that was generated and currently being used in the scene.
[/vc_column][vc_column width=”1/2″][/vc_column][/vc_row][vc_row][vc_column width=”1/2″]
3-Point Intensity
This setting controls the brightness of the lights linked to the 3-Point rig in the scene. Adjust this spinner to a level that the model looks best at.. Changing this value will live update the specified lights in the scene. It is not necessary to click ‘Generate Light Rig’ again.
HDRI Intensity
This setting controls the brightness of the HDRI dome light(s) and Environment HDRIs in the scene. Adjust this spinner to a level that the model looks best at. Changing this value will live update the specified lights and maps in the scene. It is not necessary to click ‘Generate Light Rig’ again.
[/vc_column][vc_column width=”1/2″] [/vc_column][/vc_row][vc_row][vc_column width=”1/2″]
Character Eye Level
This setting controls the height of the lights accenting a characters eyes. The value is a percentage of total height of the model where 100% is the top and 0% is the bottom. Adjust this spinner so that the target two lights are just above the character’s eyes. Changing this value will live update the light position in the scene. It is not necessary to click ‘Generate Light Rig’ again.
[/vc_column][vc_column width=”1/2″]
Render Settings
[/vc_column][/vc_row][vc_row][vc_column width=”1/2″]
Low Quality
Updates render settings to render quickly while you are working on the model and doing larger general changes. Resolution is 600×600. This is low quality for preview renders specific to the V-Ray version in use.
Medium Quality
Updates render settings to allow more resolution and higher quality than ‘Preview’ without going up to ‘High Quality’ settings. This is useful when working on details of a model. Resolution is 1024×1024. This is medium quality presets specific to the V-Ray version in use.
High Quality
Updates render settings to high setting required model submission. The 8 QA renders should be generated using the ‘High Quality’ settings. Resolution is 2048×2048. This is High quality for product rendering presets specific to the V-Ray version in use.
[/vc_column][vc_column width=”1/2″] [/vc_column][/vc_row][vc_row][vc_column width=”1/1″]
Spinner Camera Rig
[/vc_column][/vc_row][vc_row][vc_column width=”1/2″]
Select Camera Lens
The drop down menu offers camera lens options for the to be used in scene. The different options will change the Field of View and Camera distance when generating the camera rig.
Select Spinner Type
The drop down allows you to select whether the rig generates the full spherical camera rig or just the top half. This is used for models that do not need the bottom half shown.
Generate Spinner Camera
The button will create and animate the Spinner camera required for a PixelSquid model. Can only be used after the scene has been prepped. The camera must not be renamed or moved as it will break the rig. If the rig does break, simply generate the camera again.
Camera Distance
Use this spinner to adjust camera framing of your object without clipping out of frame. Scrub through the animation sequence to make sure the model does not go off frame at any point. The distance will vary based on the lens choice and the model when camera was created.
Reset
Use Reset button to set Camera Distance back to default lens selection was generated with.
[/vc_column][vc_column width=”1/2″]