3ds max offers some very useful tools you can use to color correct and composite your textures on the fly. Once you master these techniques, they can greatly speed up your workflow opening up new possibilities for your shaders.
[/vc_column][/vc_row][vc_row][vc_column width=”1/1″]
Color Correction
Quite often there is a need to slightly tweak the texture like making it darker/brighter or adjust the color. In these cases you would usually go back to Photoshop, make the changes, save the image and reload it in 3ds max. Sometimes 3ds Max fails to reload textures requiring you to manually reload them. This can be very time consuming. You can easily make most simple color adjustments directly in 3ds max that are similar to what you would do in Photoshop. Doing this allows faster iteration times between changes. Once you are happy with your the results you can replicate any changes done this way to the texture maps directly in Photoshop.
[/vc_column][/vc_row][vc_row][vc_column width=”1/2″]There are 2 basic ways to make these adjustments: Color correction map and Output map (or settings).
To use the Color Correction map, set it up in the slot where you need the texture and apply your texture to the Map slot.
Once you set that up, you have access to different color correction tools. Most of the parameters are self explanatory but some can be bit tricky. See the video for more details.
[/vc_column][vc_column width=”1/2″]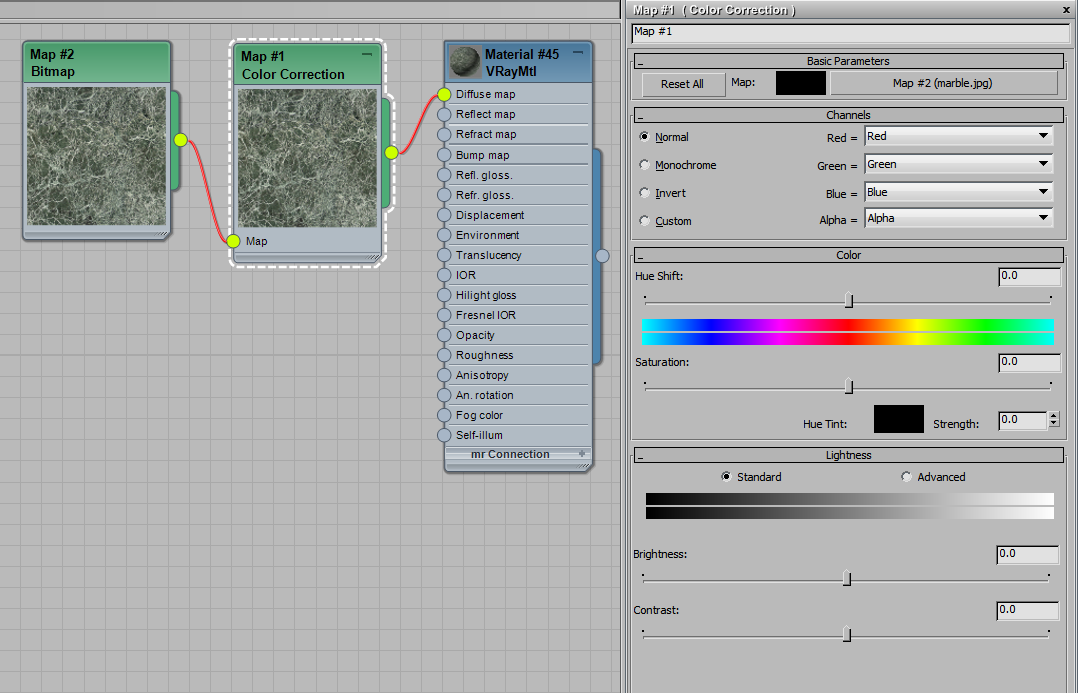
The second way to adjust the colors is with the Output settings – all bitmap textures come with an Output tab where you can make these adjustments.
Or you can also set up the Output as a separate node. This can be helpful when you do not want to modify the original texture node or want to use it in multiple places with different adjustments.
[/vc_column][vc_column width=”1/2″]
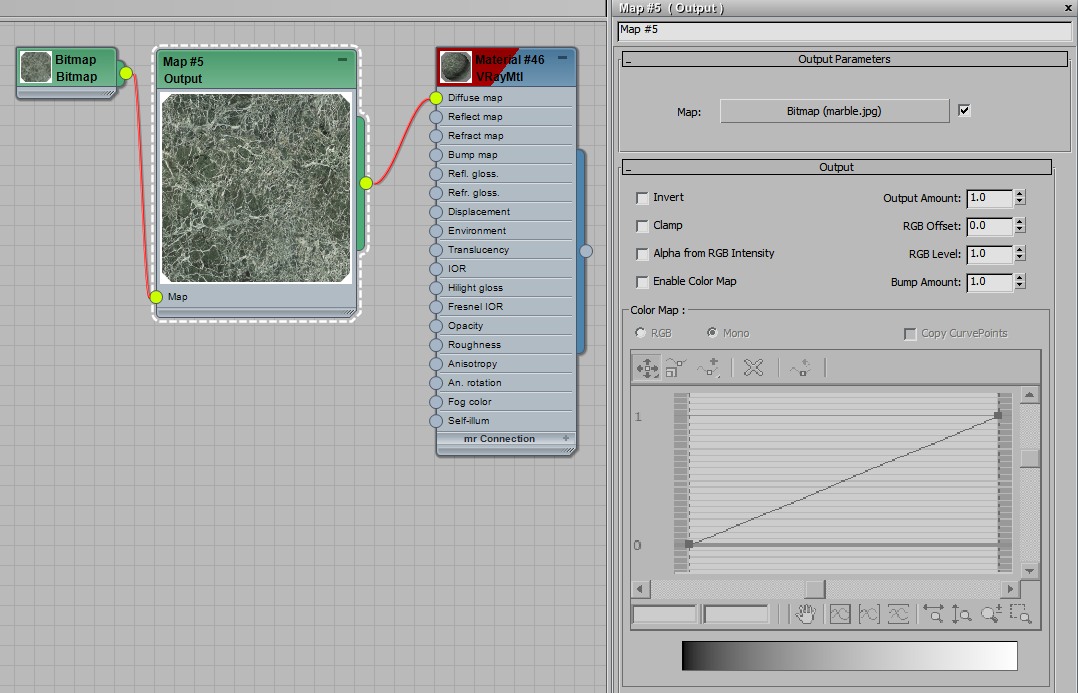
The adjustments here are a bit more confusing than Photoshop. Color Map has the same functionality as Levels and Curves in Photoshop making it more useful than Output adjustments. It can be powerful tool for adjusting the color balance once you know how to you use it.
You can use multiple nodes and combine Output with Color correction or combine multiple Color corrections, so the possibilities are endless. Although, in reality you would probably use only a few adjustments. There is no need to complicate things too much.
In the example you can see how using these methods you can create a complete shader using only one texture map.
[/vc_column][vc_column width=”1/2″]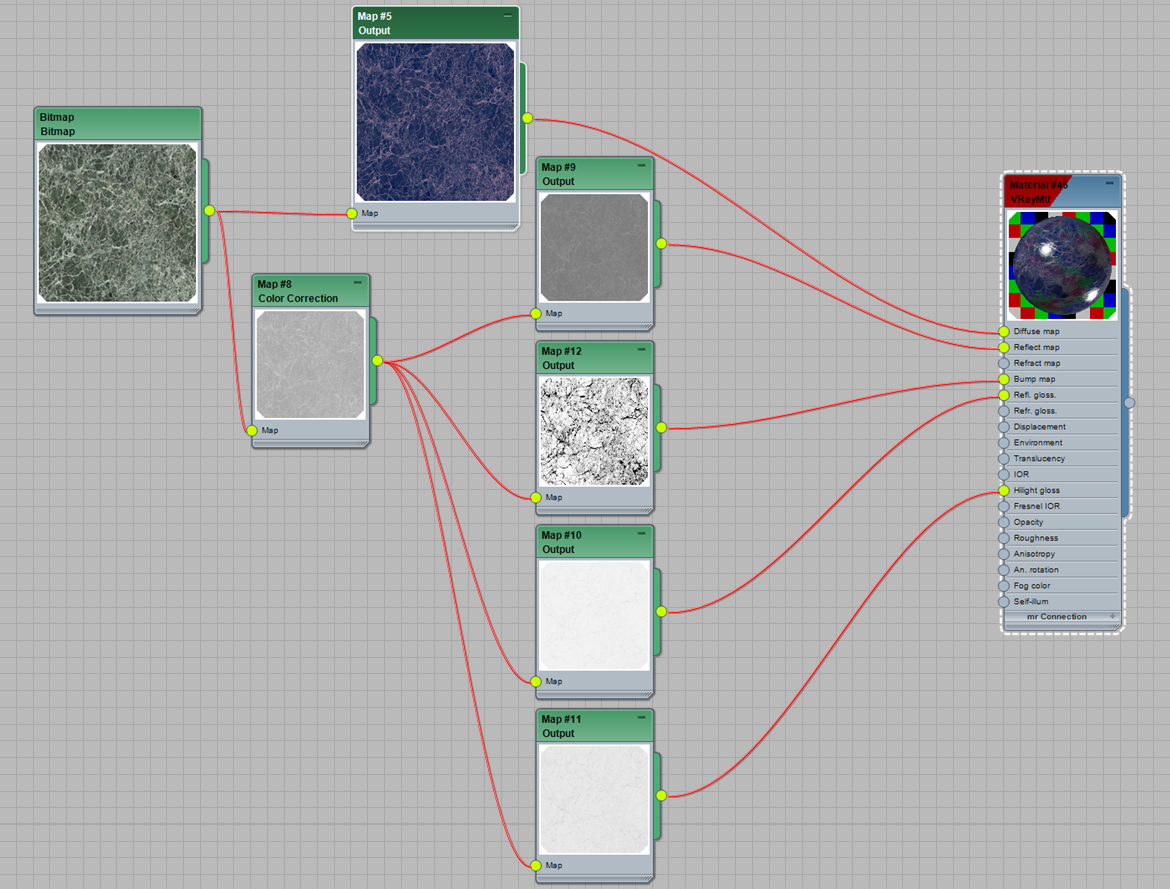
Mixing and Masking
Once you have mastered the basic color adjustments try the more advanced techniques of compositing or blending multiple maps together to get more complex results.
[/vc_column][/vc_row][vc_row][vc_column width=”1/2″]
Mix Map
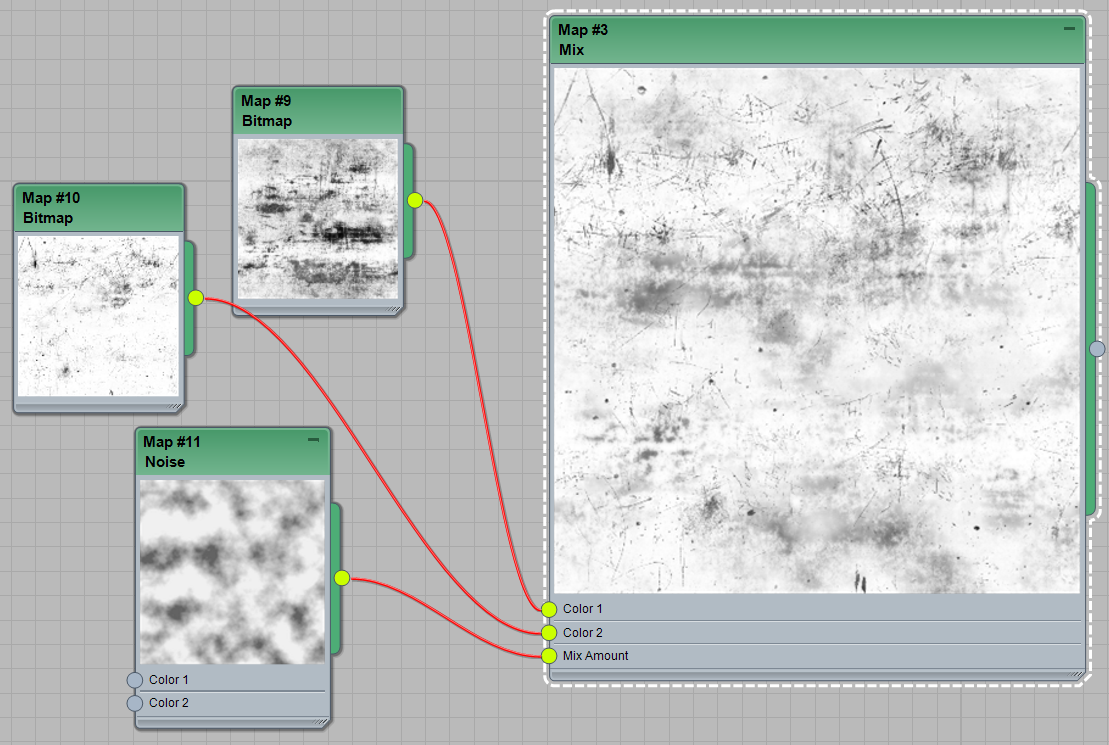
The most basic tool for mixing is the Mix map. It allows you to blend together maps or colors usinga value or another map to control the blend. It works just like blending 2 layers in Photoshop when not using map to control blend amount. The Mix amount is the Opacity of the second layer. Set it to 100 and the second layer is 100% opaque, lower it and the first layer starts to show through. The example shows a Mix where the first layer is 100% red and the second layer is 100% green.
[/vc_column][vc_column width=”1/2″]

Using a Mix amount map is similar to using layer masks in Photoshop. Each pixel defines the opacity of the second layer. White pixels are completely opaque (only second layer visible) while black pixels are completely transparent (only first layer visible). Everything between pure black and pure white is a percentage value. Here is the same example as above, this time using a texture to define Mix amount.
You can also mix together maps and textures instead of simple colors. Here is an example of using a procedural Noise map to mix together two different textures. This allows you to create much more complex result than a single texture. You can still do individual color corrections to each map and change the tiling and rotation as you can with any map slot. This kind of workflow is very flexible and non-destructive. Remember to be cautious of getting to complicated so it may have undesired effects on rendering time and calculation.
[/vc_column][vc_column width=”1/2″]
Another good way to use the Mix map is to define reflection and glossiness maps with a single b&w texture (or a more complex map). You can very precisely set the numerical limits (using colors) to define a range of values for the map. For example, if you want to use a texture for your glossiness map and you want to keep the glossiness in the 0.7~0.8 range. Set the texture in the mix amount slot and set the 2 colors to 178 (255*0.7) and 204 (255*0.8). Now the resulting glossiness is exactly in the range desired. Most of the time you would probably not do any precise calculations, but use your eyes instead to tweak the colors until you get the effect you are looking for. To make sure you are using the full range of values, you need to use and image that has correct levels (full range of contrast) from 0 value black to 100 value white.
[/vc_column][vc_column width=”1/2″]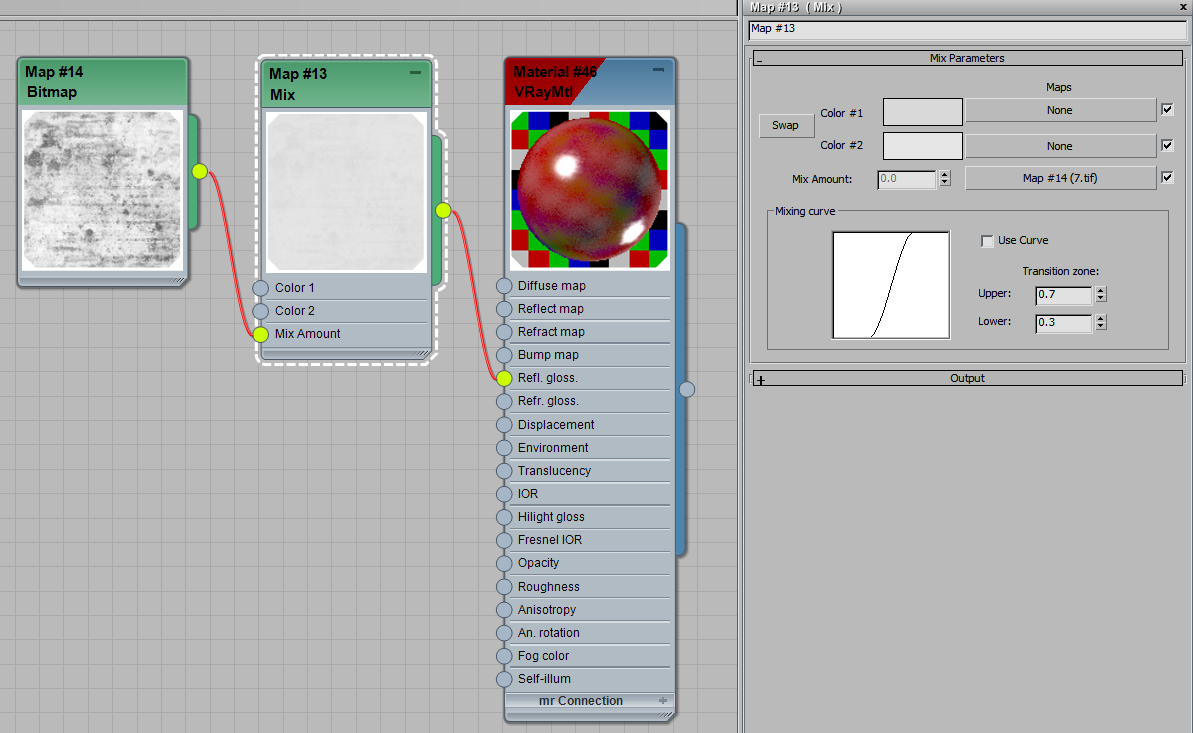
Composite Map
Mix map is a great tool, but is limited to only 2 layers. You can string multiple Mix maps together, but it can get confusing and heavy on calculation very quickly. A better way to blend more than 2 maps together is using a Composite map.
This map features a Layer stack very similar to Photoshop. You can add dozens of layers, set opacity and blending mode for each. You can also use separate masks and/or color correction for each of them. All the blending modes you’d see in Photoshop (multiply,overlay, hard light, soft light, etc.) are available for use. See the video to learn how to use the basic functions of Composite map.
[/vc_column][vc_column width=”1/2″]
You don’t have layer Groups like in Photoshop, but you can use a new Composite map or a Mix map in any of the map or mask slots. So you can nest as many composites together as you need for your final map. Just be mindful of how complicated the shader tree gets. Though similar to Photoshop, it is more ideal to create the textures maps in place of nesting multiple mix, blend, and composite maps.
[/vc_column][vc_column width=”1/2″]
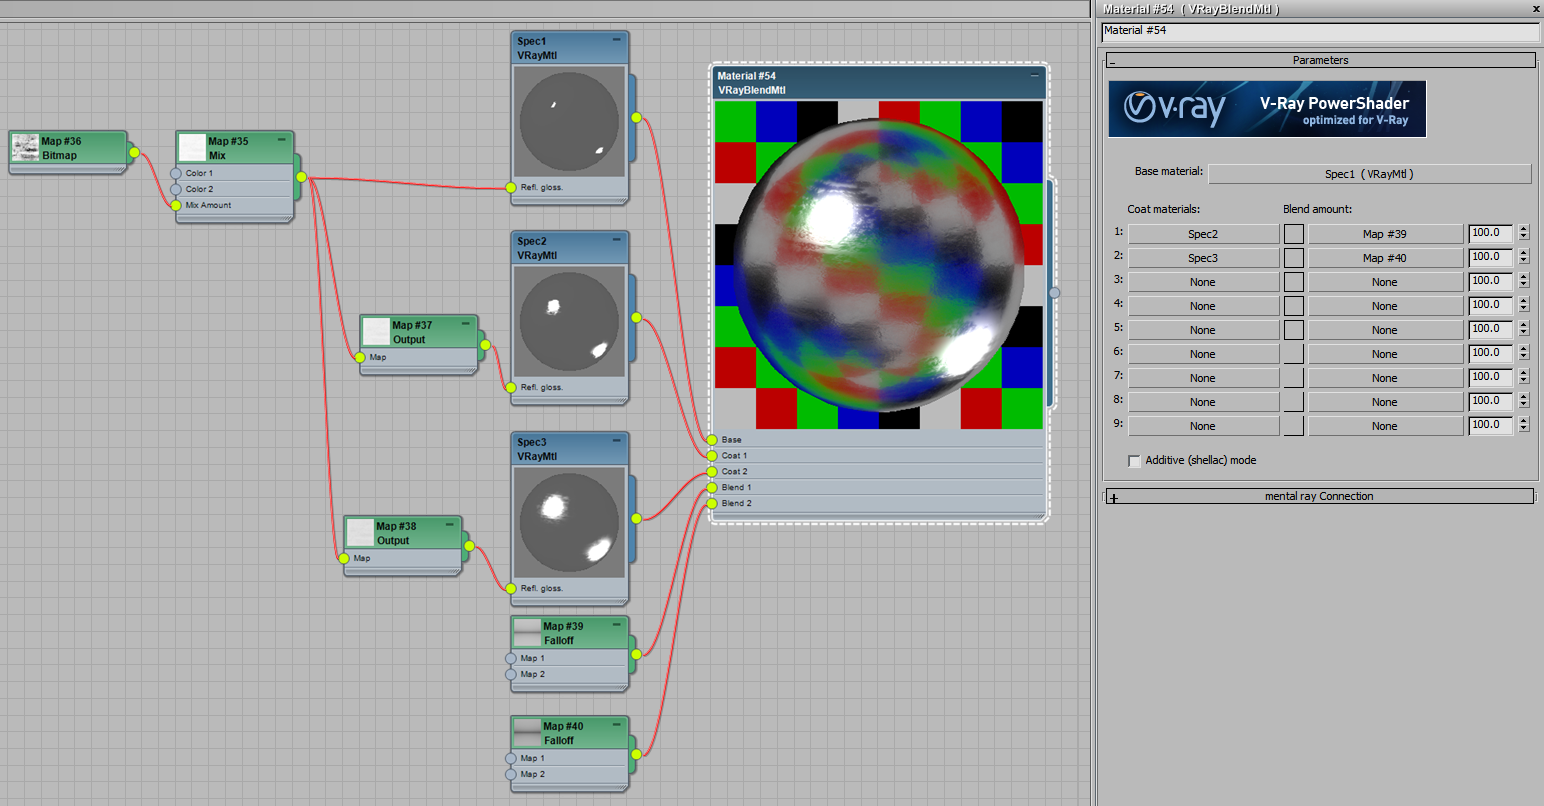
VrayBlend Map
Finally, there is one more technique you can use to blend different effects using V-Ray, the VrayBlendMtl. The main difference from Mix and Composite maps is that this is tool for blending complete shaders, not just maps. It’s advantage is that you can make multiple complete materials that are radically different with their own complexity and blend them together all at once. It simplifies the workflow quite a bit when you are dealing with surfaces that have details that are different material types across the same geometry.
This map features a Layer stack very similar to Photoshop. You can add dozens of layers, set opacity and blending mode for each. You can also use separate masks and/or color correction for each of them. All the blending modes you’d see in Photoshop (multiply,overlay, hard light, soft light, etc.) are available for use. See the video to learn how to use the basic functions of Composite map.
[/vc_column][vc_column width=”1/2″]
The basic functionality is similar to Mix and Composite maps, but the layer order is reversed to what you’d see in Photoshop or Composite map, blending from the top down with the lowest layer being the top visible in the stack.
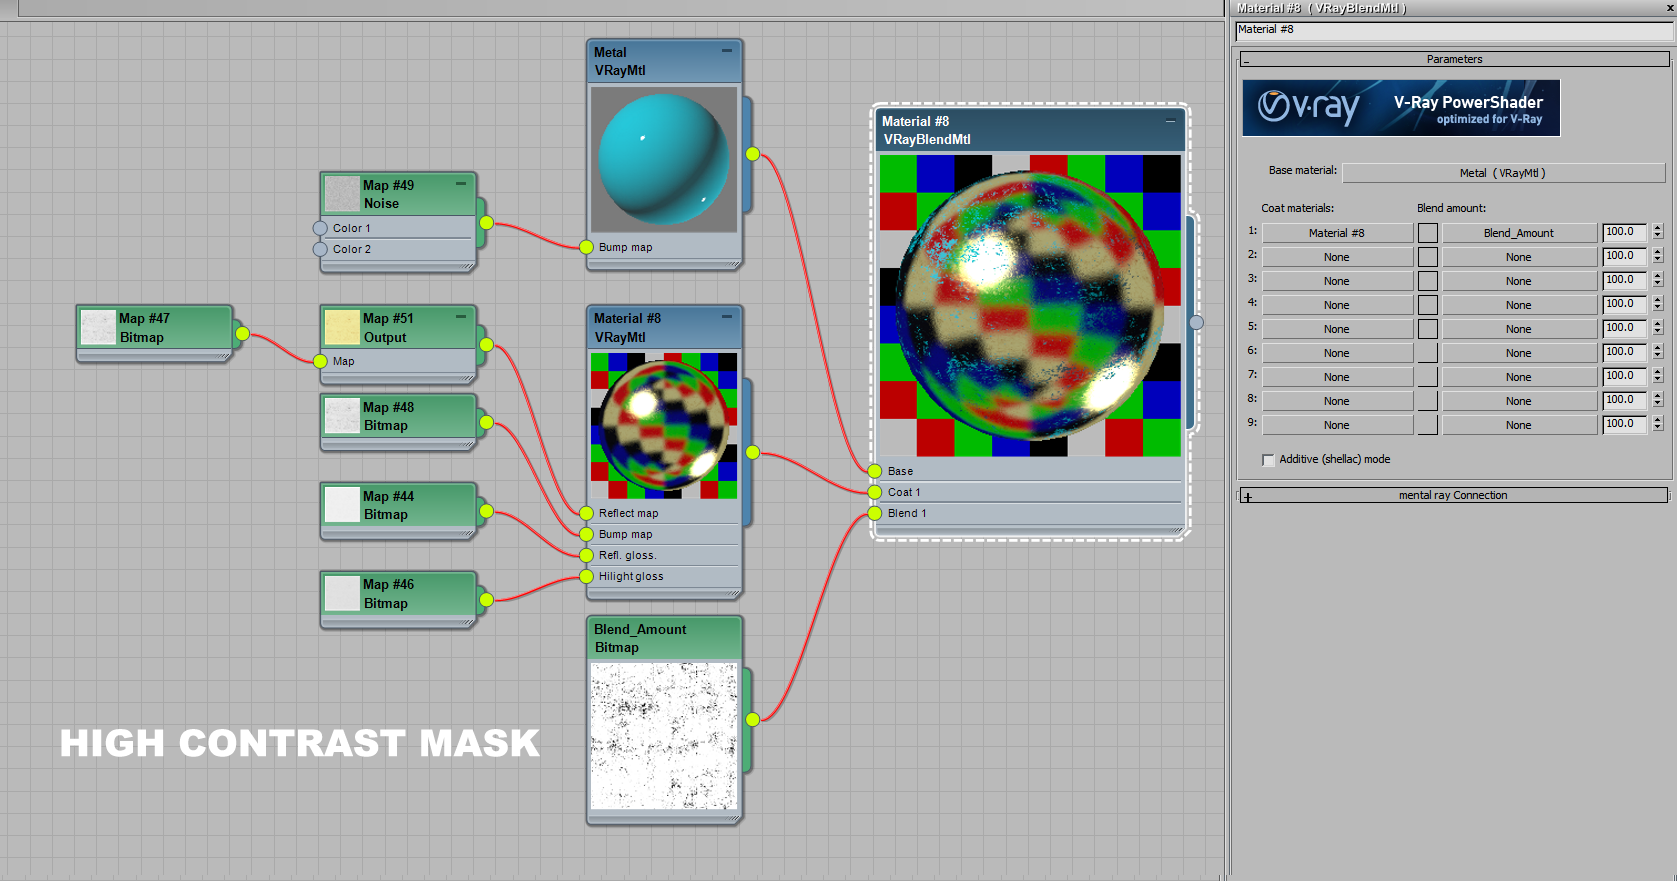
As before, you can use either a color value or a map to define the blending amount. It should be pretty intuitive working the same way as the masks in the previous examples. One thing worth noting when blending two different materials (paint and metal for example), you want to use a high contrast map. The goal is usually getting some areas that are pure metal like the paint is flaking off. Using a low contrast map would give you a strange color tinted metal blend of the two materials.
[/vc_column][vc_column width=”1/2″]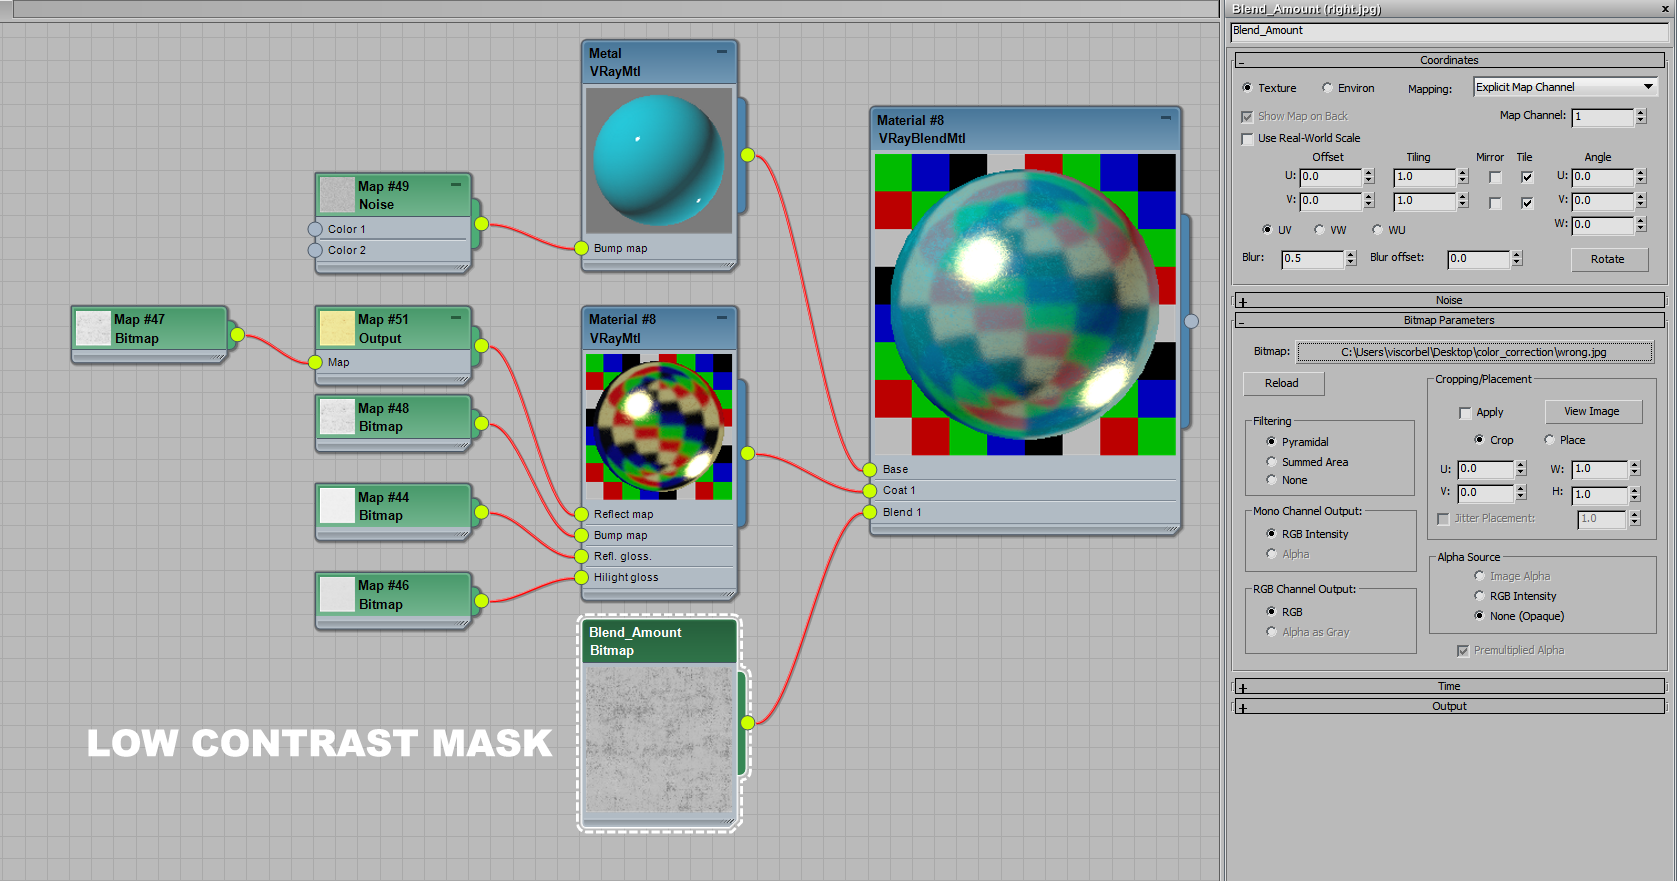
Most of the time this shader is used to combine multiple different looking materials in a single step. Here is a series of examples of different surface types.
Rust on metal objects. The blend mask in this example is defined by a VrayDirt map with Z bias for vertical streaks and a radial texture.
[/vc_column][vc_column width=”1/2″]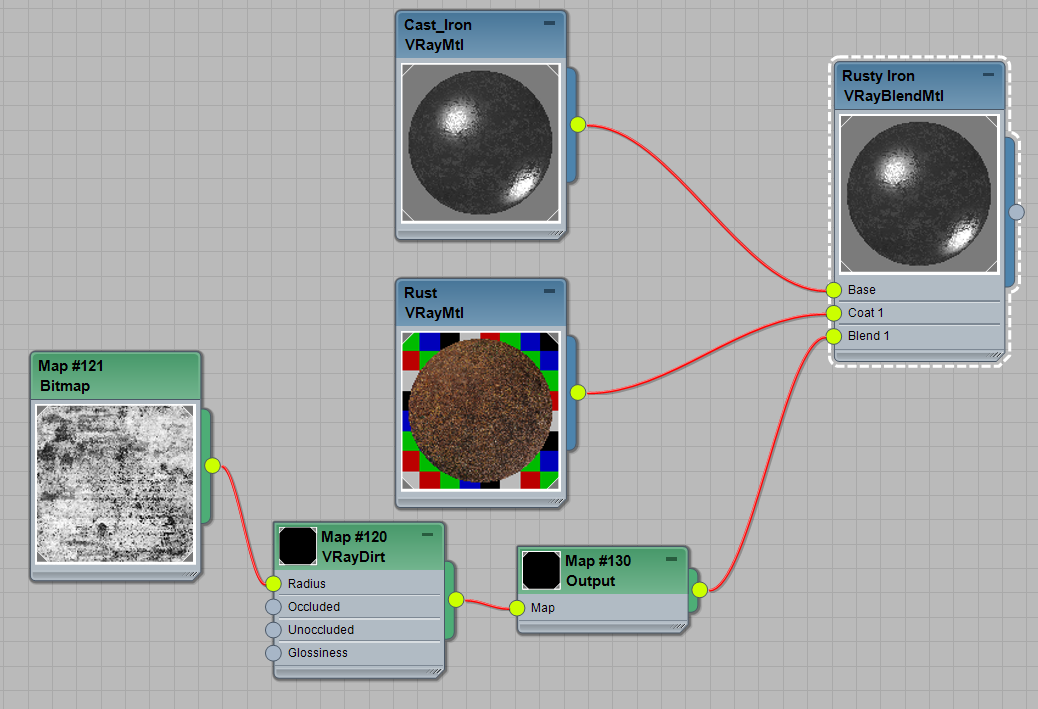

Paint patterns on wood. A black and white texture works great as a mask.
[/vc_column][vc_column width=”1/2″]

Moss on rocks. A fuzzy Moss material is blended on the rocks using a procedural falloff texture. This way the moss is only on the surfaces exposed to rain.
[/vc_column][vc_column width=”1/2″]

Another, less common use for it is blending different reflection properties in a single material. In this case, you want a low contrast mask or a greyscale value as the Blend Amount. A couple of examples would be adding a reflective clear coat to a material or simulating a multi-lobe falloff for specular highlights. For the first example, you would use a duplicate of the base layer as the coat layer and just change the reflections to a brighter, more glossy look.
For the second, you need 2 copies and a careful adjustment of the glossiness. The Falloff maps in the Blend amount slot are there to replicate the effect of glossiness increasing at glancing angles. So the reflections are most blurry perpendicular to viewing angle and become more glossy as they approach parallel. If you check out some real world objects that are not completely glossy, most of them show this type of behaviour when rotated against a light source or other bright object to evaluate the reflections.
[/vc_column][vc_column width=”1/2″]
If you are using V-Ray 3, there is a simple way to add bump to all blend layers at once. Just run the whole VRayBlend into a VrayBump material. It allows you to set a global bump to the whole object while keeping the detail bump from all the individual layers in the stack.
[/vc_column][vc_column width=”1/2″]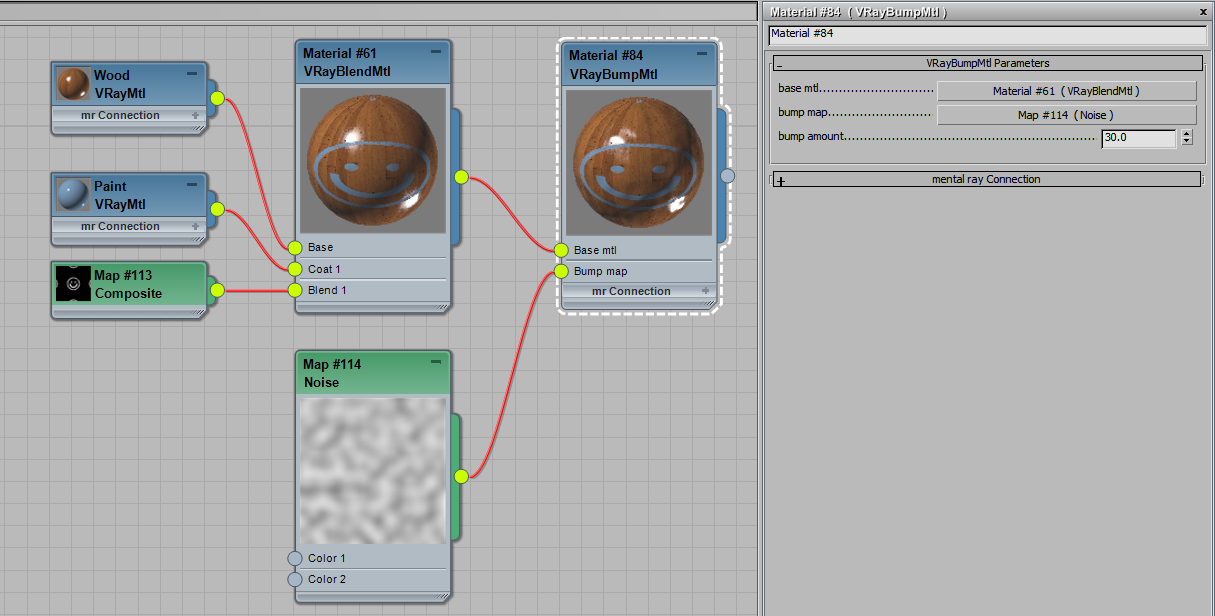
Using Mixing and Masking to reduce tiling effects
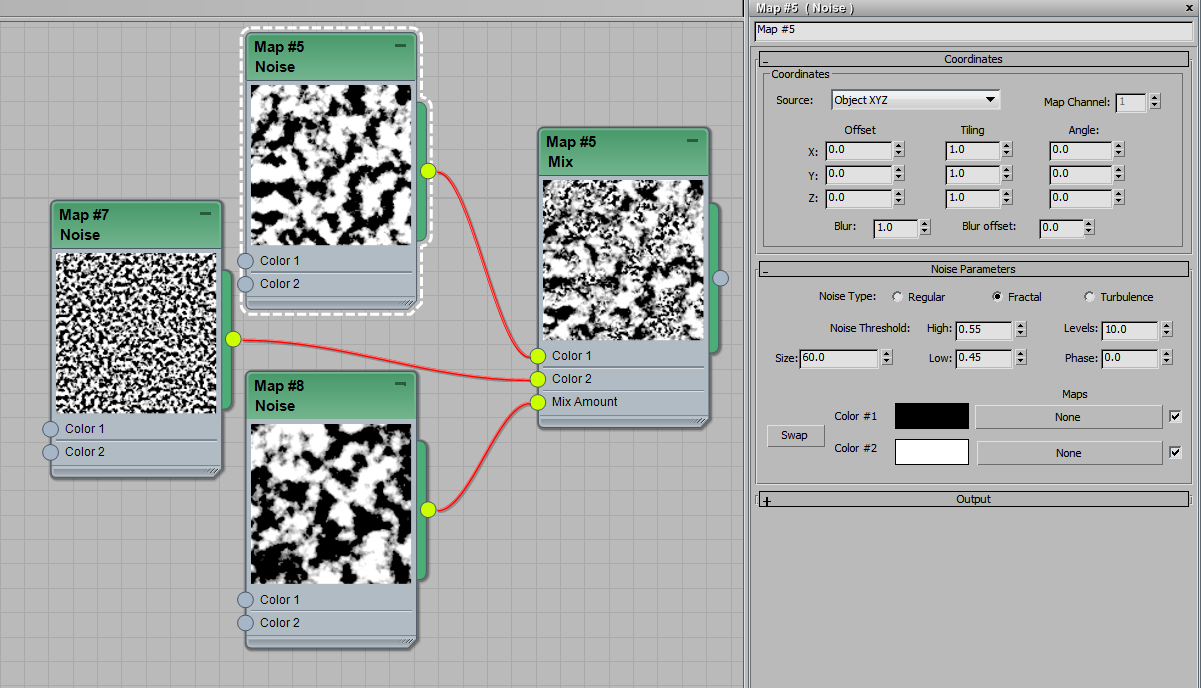
If you have to texture large, flat surfaces it can be difficult to avoid noticeable tiling. Especially if the scale of your tileable texture is not big enough. Fortunately, you can use some creative mixing and masking to make the tiling less obvious. This technique works only for textures without strong contrasting, identifiable shapes. Materials like dirt,wear,bump, and scratchmaps that are usually more chaotic in appearance with fine details.
[/vc_column][/vc_row][vc_row][vc_column width=”1/2″]This is how the setup looks in a composite map. The second and third layers only have the UV offset and rotation adjusted, the texture bitmap is the same. Using some masks like a fractal Noise map can work well here, you can define where each layer is visible. Experiment with the mask maps and scale to get something that looks good. The shape of the mask on each layer should be different so they do not cover the same exact area. Usually one layer with larger scale noise mask and the second layer with smaller scale noise mask work quite well.
It is better to set up the masks so they have high contrast without reaching pure white or pure black in areas. That way the masks are not noticeably tiled themselves. This is where procedural maps like Noise come in handy. There is no risk of tiling and you can increase the size as much as you want without losing quality. Mix a couple of different sized Noisemaps together to get a more interesting and detailed result.
[/vc_column][vc_column width=”1/2″]
This first image is a single, unmodified texture. Notice the extremely obvious tiling.
[/vc_column][vc_column width=”1/2″]
Add another layer with different offsets and rotation like this example. You can see the difference already.
[/vc_column][vc_column width=”1/2″]

After adding the 3rd layer to the stack the tiling is much less noticeable making it more realistic visually.
[/vc_column][vc_column width=”1/2″]

Finally, you can break it up even further, by running it through another mix map and mixing with a modified version of your texture. The output settings have been adjusted to have a slightly brighter, lower contrast look. A large scale fractal Noise map is used as the mask.
[/vc_column][vc_column width=”1/2″]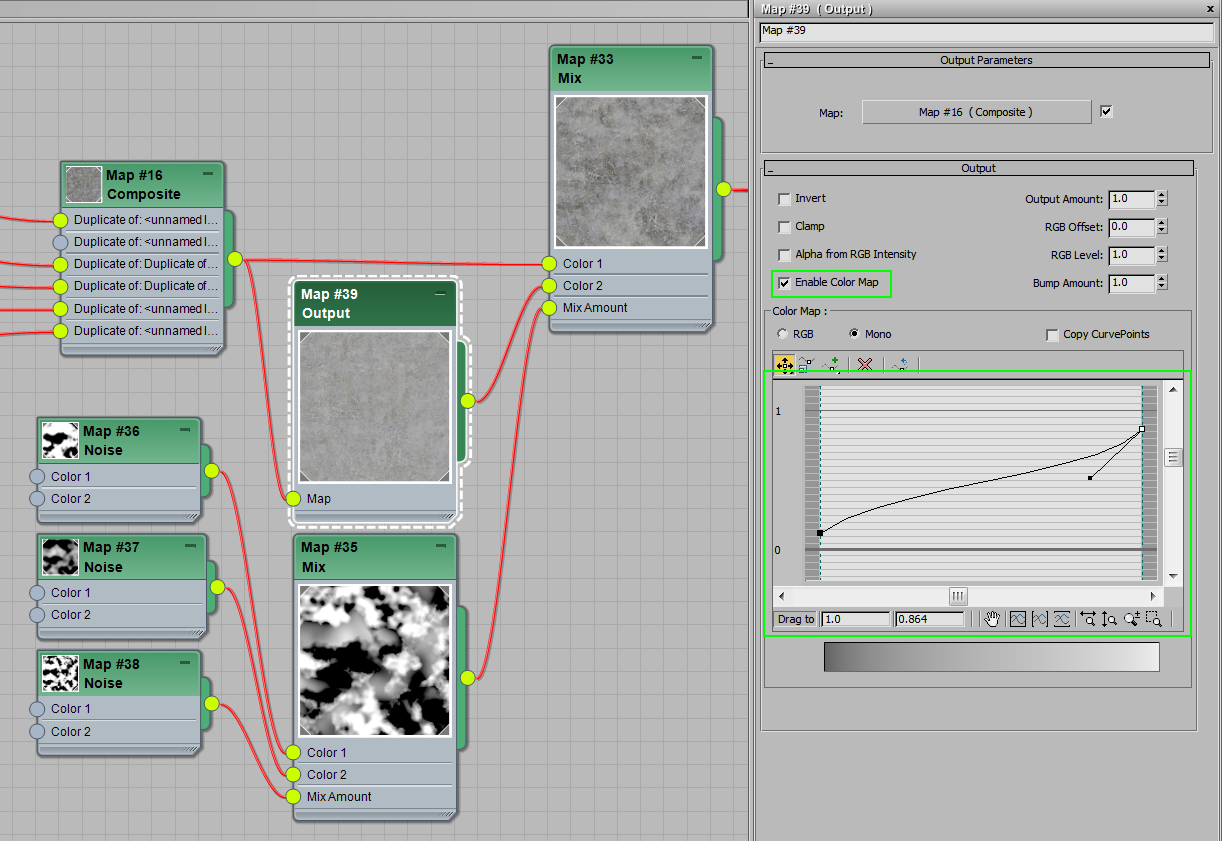

If you want to create texture maps for reflection,glossiness, or bump based from the Diffuse map, you must use a few compositing tricks. It is more than just making the maps in Photoshop, since the original texture has been modified quite a bit by this point. Some output and color correct nodes will allow you to get exactly what you need directly in 3ds max.
You can add additional detail to any of the maps using a new composite map adding the details in a new layer. This is not shown in the image to avoid the example becoming too complicated.
[/vc_column][vc_column width=”1/2″]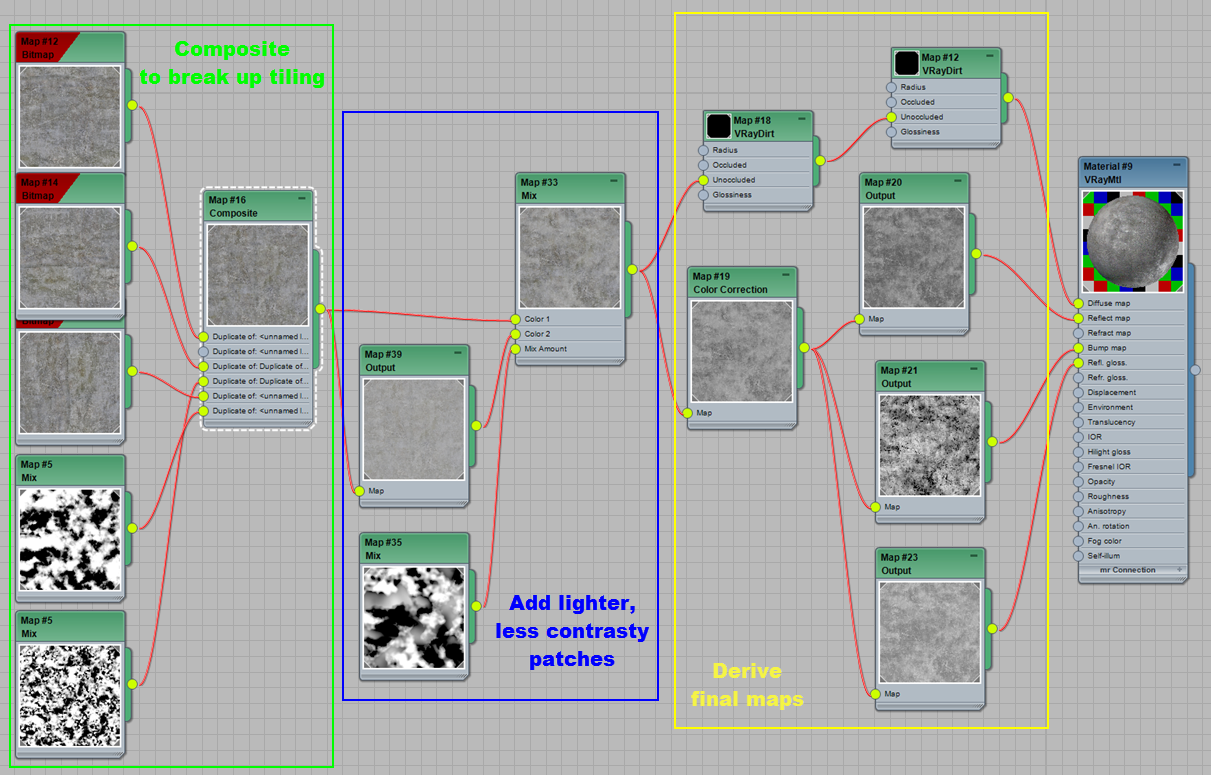
You can make a shader as complex as you like, but keep in mind that there is a rendering performance hit for each additional node in the tree. Making an overly complex shader also increases difficulty to edit. It is best to do least amount of compositing possible to get the desired look. If you can get away with just 2 layers to avoid obvious tiling, use just 2 layers. If it’s not enough increase only one layer at a time.
[/vc_column][/vc_row]