Bitmaps are not the only maps you can use for generating various shaders. 3ds Max and other softwares have various built-in procedural maps that are generated using mathematical functions. These can be a great way to create masks, generate bump detail or any other maps for your materials. Their biggest advantages are that these maps are completely seamless (even on objects without UV coordinates) and unlimited in resolution. This will cover 3ds Max specifically.
[/vc_column][/vc_row][vc_row][vc_column width=”1/2″]
Since procedural maps are calculated at rendertime, there are a couple of problems with previewing them in viewports. The size does not match between the material editor and viewport. Secondly, the maps look different than viewport previews when rendered. You need to change some settings and can use external tools for previewing them accurately. First, set Render Sample size in Material Editor options to 30 centimeters. This will help with scaling of the procedural maps.
Now install the SoulBurn Scripts collection by Neil Blevins and set up a shortcut for the TexMapPreview script. This handy little script allows you to very quickly and accurately preview exactly how the map will look when rendered.
[/vc_column][vc_column width=”1/2″]

Standard Procedurals
These are used to generate independent patterns, not related to the 3D shape of the object in any way. Think of them as regular, tileable textures that are not specific to any single object.
[/vc_column][/vc_row][vc_row][vc_column width=”1/2″]
Noise
Noise is probably the most useful map for basic procedural materials. Although it does not look very impressive intially, it can be used for a lot of things. You can add distortion or ripples to a surface, mix multiple textures in a random pattern, create new patterns, add variation to color corrections, create scratches, and so on. Your imagination is the limit.
The second image is an example of Noise maps in use. The whole cast iron shader is created using only various Noise maps composite together. This is an extreme example of what can be done.
When a procedural material’s shader tree is this complex it’s very difficult to edit and effects render time. If the situation allows for it, texture maps loaded in place of the complex composites is more ideal. Again, this is an extreme example.
[/vc_column][vc_column width=”1/2″]


One of the basic uses for Noise maps would be adding a large scale distortion to a shader. Since nothing is perfectly flat, you can make any material a bit more realistic by adding this type of Bump. Use a large size value (relative to other texture detail) and leave the rest of the settings alone. The bump amount needs to be pretty low to look realistic. Here is an example of this subtle effect in action
You can also add very small scale Noise as Bump to simulate the orange peel effect (very common on painted or lacquered surfaces). Again, a pretty low Bump amount is needed and there is no need to adjust any other parameters of the Noise map except for it’s size.
For other uses (custom masks, reflection/glossiness maps and other bump effects) a single layer Noise map is too basic to look realistic. Fortunately you can make it look more random by combining multiple Noise maps or using Mix and Composite nodes. The idea is to try and break up the mathematical look by making it more random. Combine areas of high frequency detail combined with low frequency detail like contrasted shapes and blurry shapes. Variation is what makes things look more natural.
Try using different sized bump, different high/low levels, or combining Regular and Fractal Noise. There are no real rules here, so have fun and experiment a bit. If you make a good looking map you can bake it down into a texture map or put it in a material library that you can use again later to save time.
[/vc_column][vc_column width=”1/2″]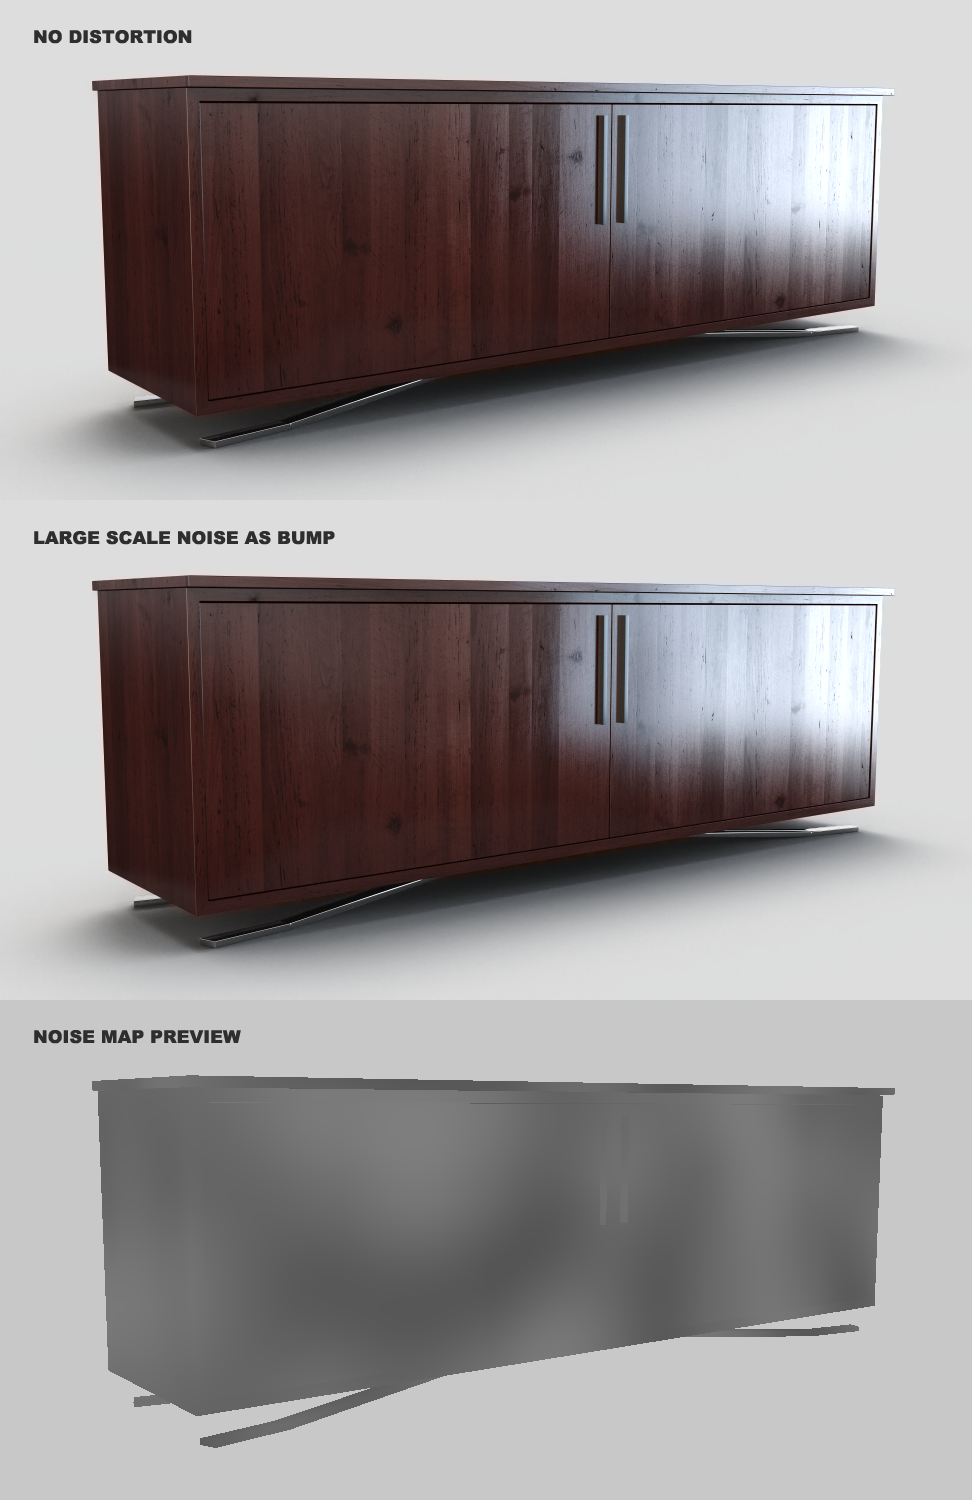

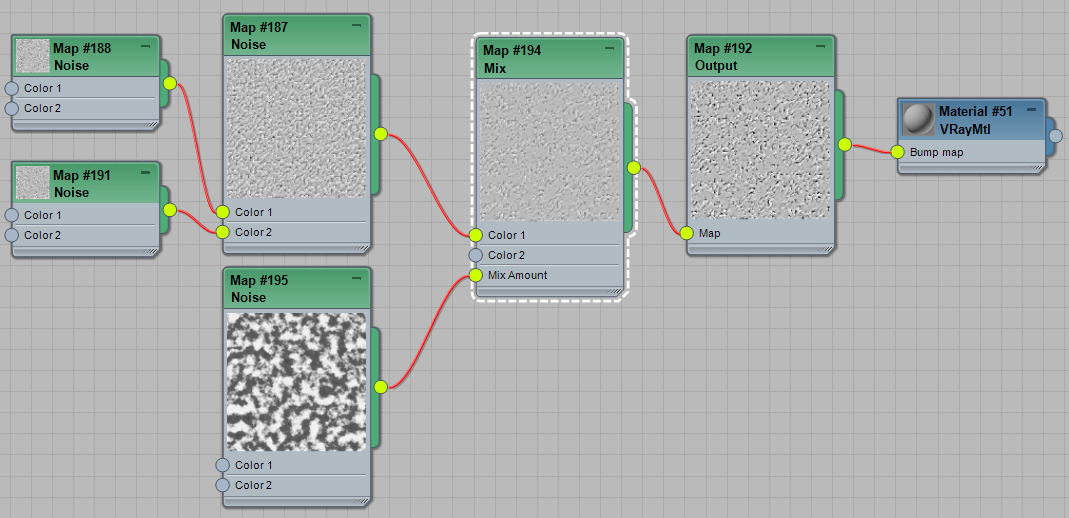
Here is an example of just using 3 different size noise maps together to create a more irregular pattern. The main map is Fractal with slightly increased contrast, while the other two are just Regular noise. Good for breaking up the color of the shader or adding some variation to the bump.
[/vc_column][vc_column width=”1/2″]


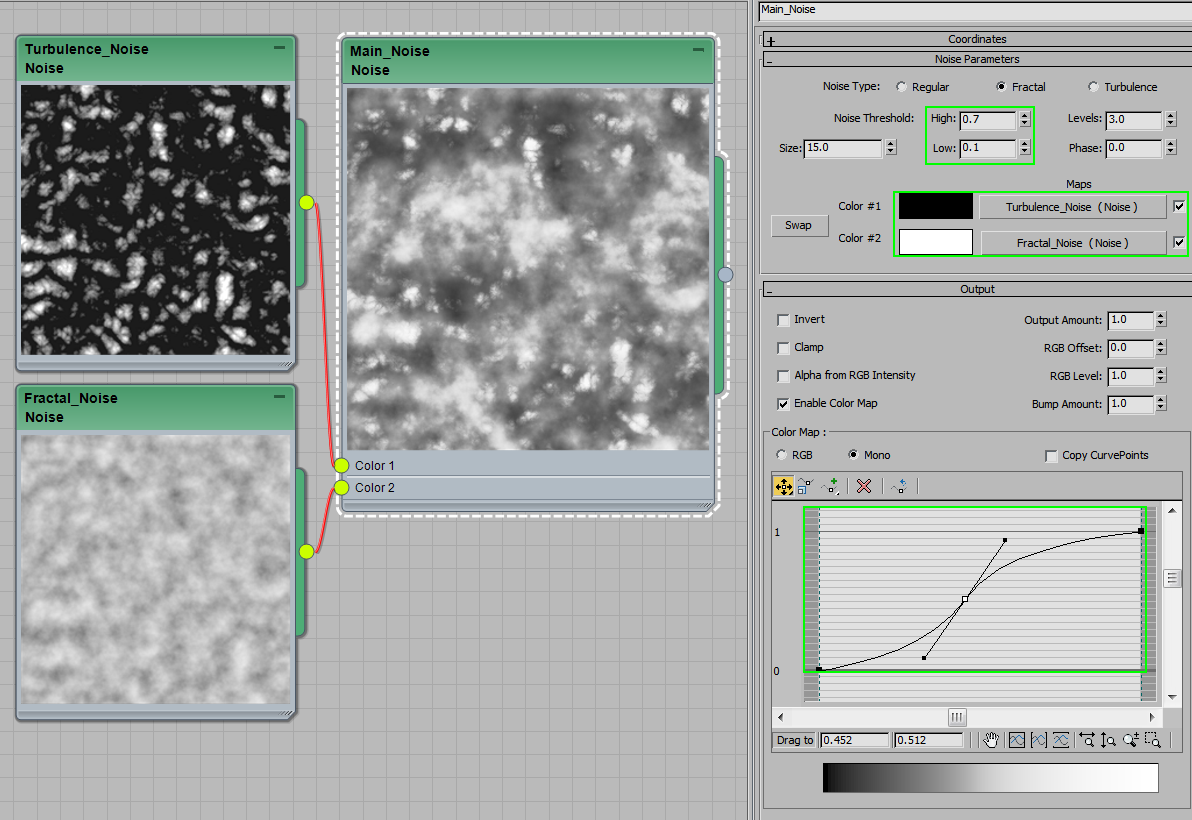
Here are 3 Noise maps with same size, but different Offset values. When using high contrast for the main Noise map, you can get a really interesting flaking effect for a bump map. The offsetting technique allows to combine soft noise gradients with hard edges. Combine it with some grey color by using a Noise map as mix amount to some smoother areas.
[/vc_column][vc_column width=”1/2″]

High contrast and small size can be used to create black or white speckles. Great for adding some dirt spots in the Diffuse or small bumps in the bump map. These speckles can also be used to add small reflective dots in the reflect map. If the bump does not seem to work correctly when using composite maps try putting it in a VrayColor2Bump node which should fix it.
[/vc_column][vc_column width=”1/2″]


If you reduce one or two of the tiling options you can create a scratch pattern. Use the texmappreview script to see which ones need adjusting. Add a mask such noise and you have random patches where the surface is scratched up.
[/vc_column][vc_column width=”1/2″]


You can also combine the Noise map with other types of procedural materials or bitmaps to make it even more flexible.
If you come to a point where your texture takes huge amount of time to render or you simply want to merge everything down to a single map for portability or cross-application compatibility, use the TexMapBaker script from the Soulburn scripts to quickly render out the texture. When using the created map, you will need to make sure that the blur setting is turned down to minimum, otherwise you might get glitches along the UV seams.
[/vc_column][vc_column width=”1/2″]

Cellular
This is another very powerful map to have in your toolbox. As the name implies, it creates a map that features a lot of small cells. You can adjust a lot of parameters like Color, Cell value variation, Size, Cell type and more. Check the help files to get a rough idea on what each of these parameters does. The best way to learn is just trying them out by yourself and seeing how different combinations look.
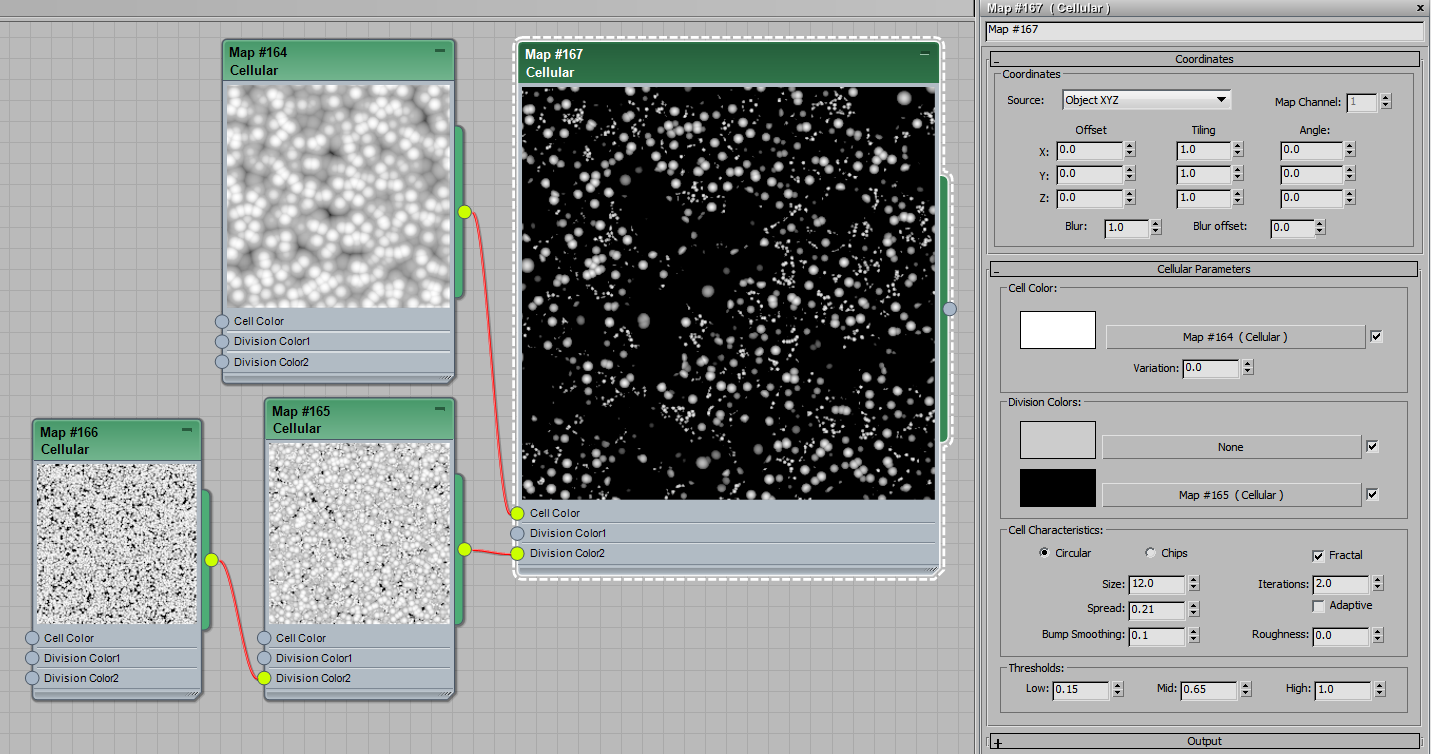
This is great for adding some small speckles that have more gradual falloff than high contrast noise. Or any other sort of blobby-looking maps. Combine multiple Cellulars with different sizes to get a more detailed and random look.
If you use the resulting map as a mask for some high contrast noise, you can get an even more interesting map. The blob-like shapes are not as perfectly round anymore and have much more detail. That is the reason of making procedural maps. Combine them to get rid of the perfection for some natural variation making things more realistic.
[/vc_column][vc_column width=”1/2″]
These speckles are very suited to create outwards bump, as the resulting shape is nice and rounded with smooth sides. The speckles generated by Noise maps don’t have this look – they are hard edged without falloff at the sides.
[/vc_column][vc_column width=”1/2″]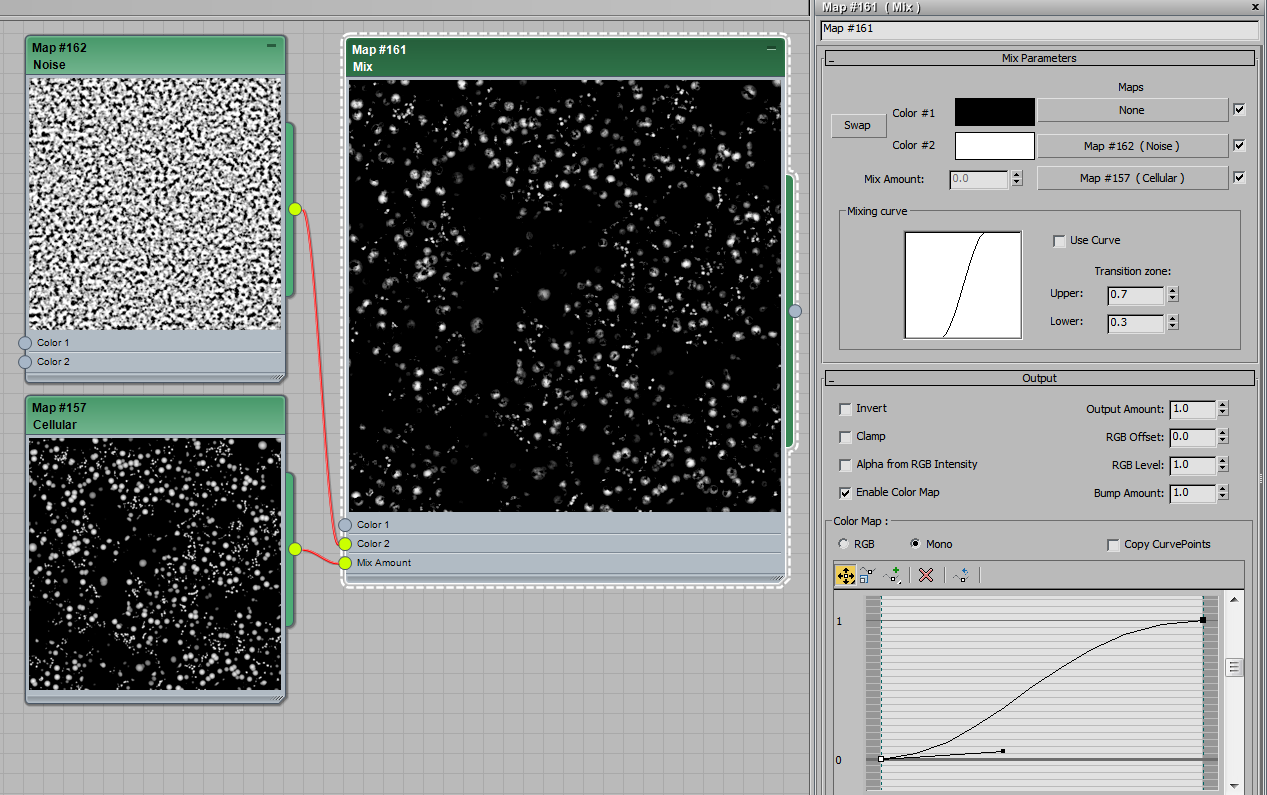


Use Chip type maps if you want a some angular elements in your map. This is a good way to break that smooth or soft surface up. Here is an example of a chip map mixed with Noise to break up the straight lines. This example uses blends some reflective ceramic pieces in the clay using Cellular as a VrayBlend mask.
[/vc_column][vc_column width=”1/2″]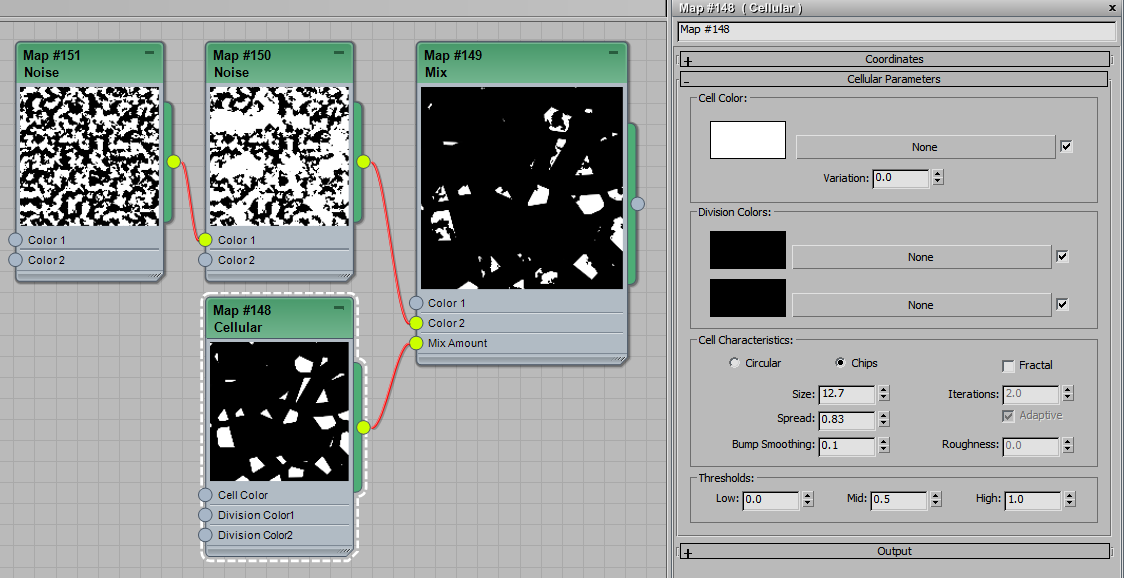


Other Procedural Maps
There are other types of procedural maps in 3ds max as well – smoke, splat, wave, dent, stucco, marble, etc. But those are pretty limited to creating a single pattern without many adjustments. You may not use them much, but they could be used to quickly add a particular effect to your composite or to add some additional texture. It is worth experimenting with them to keep in mind if a situation calls for it.
[/vc_column][/vc_row][vc_row][vc_column width=”1/2″]
VrayDirt
VRayDirt is an ambient occlusion based map that is great for darkening inner or outer corners of the object or adding any other custom effect to those areas. If you are using it just to add AO, set up your texture as Unoccluded and a darkened version (or dark color) as Occluded. If using as a mask, you would usually set the Unoccluded color to black and Occluded color to white.
[/vc_column][vc_column width=”1/2″]

By default it masks the inner corners, outer corners can be masked with the Invert Normal option on.
![]()
You can adjust the effect closer to the corners by increasing the Falloff value
[/vc_column][vc_column width=”1/2″]

If you are using dirt as a mask, you might need to increase the sample amount and run the Dirtmap through an Output map to get the effect as strong as you want.
[/vc_column][vc_column width=”1/2″]

Adding a Z bias value can stretch this effect vertically for leak-type effect. Great for aging concrete and other outdoor materials that are exposed to rain.
![]()
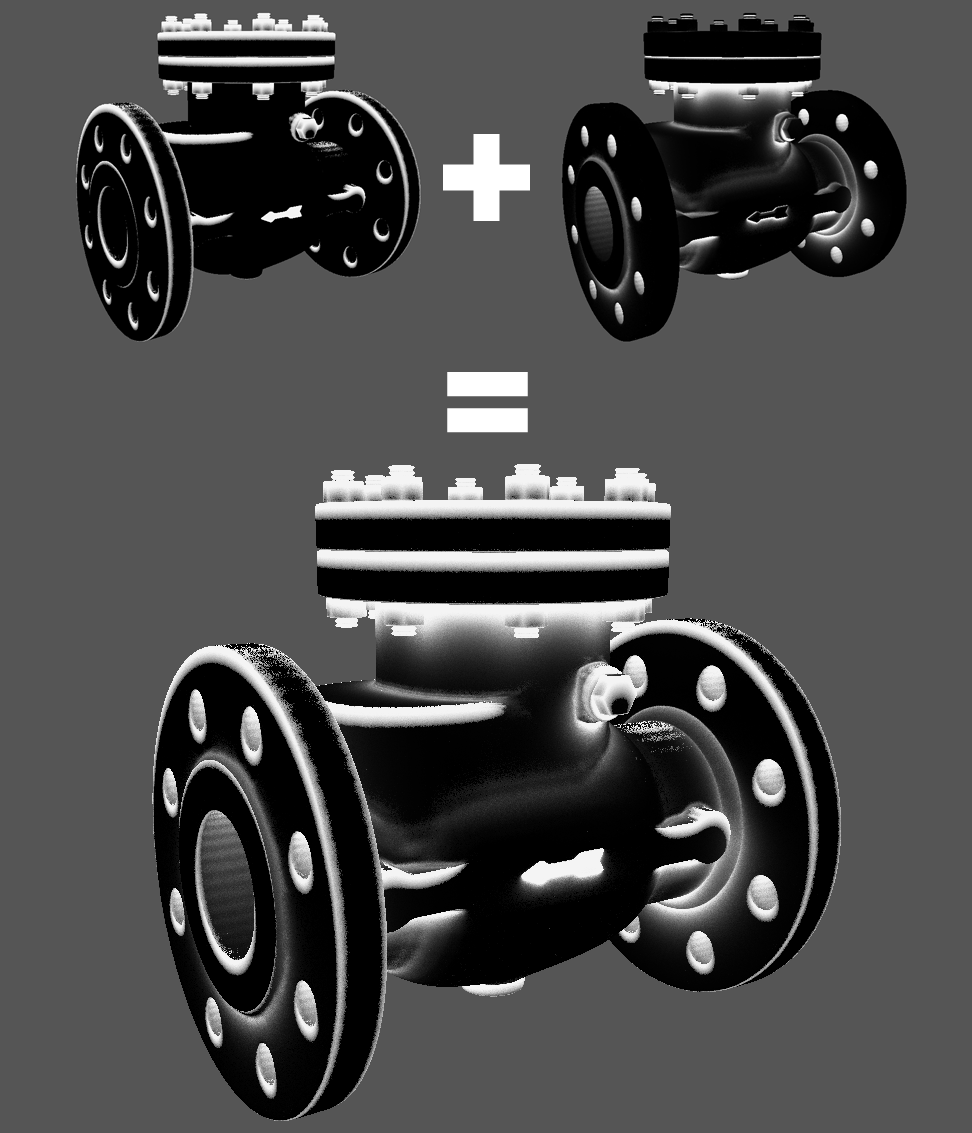
To get a full effect, where leaks are are coming from inner and outer corners, combine inverted dirt with regular dirt in a composite map. Adjust each map individually and once you are happy with them, layer them together.
[/vc_column][vc_column width=”1/2″]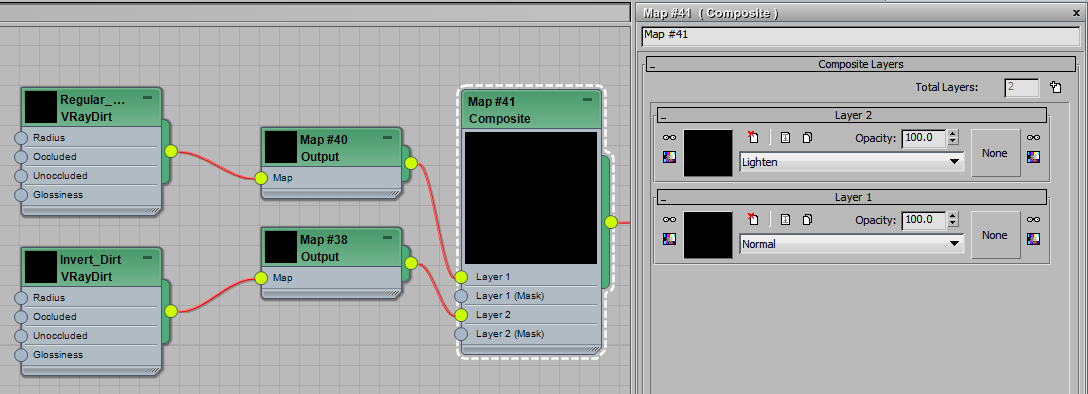
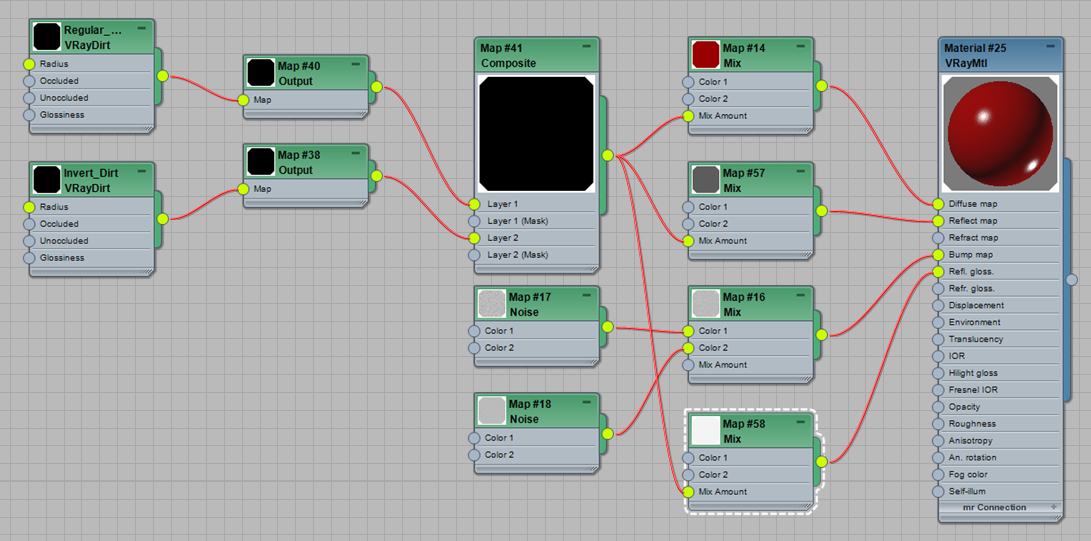
Use the Dirtmaps with a Radius texture to create a more realistic result. Combine some different sized Fractal noise stretching it vertically by reducing the Z tiling.
Here is the same mask, used to drive the Diffuse color, Reflections and Reflection Gloss.
To get the most out of Dirtmap, use it as a mask in either composite textures or VrayBlend materials. You could add damage to outer corners of an object, add patina, color correction, make the masked areas more/less reflective, add bump to them (or reduce bump), blend different shaders together to add rust or oil leaks and so on.
[/vc_column][vc_column width=”1/2″]

Falloff
This map generates color depending on either the orientation of the object in 3d space or the orientation of the object relative to the viewing angle.
It’s great if you need to add soft or fuzzy look to an object, just set your main texture map in both color slots. Then mix the second map with the a brighter color. Adjust the Falloff curve so the effect is only visible at the edges. Very useful for fabrics, moss, carpets, fine fuzz like peaches, etc.
[/vc_column][vc_column width=”1/2″]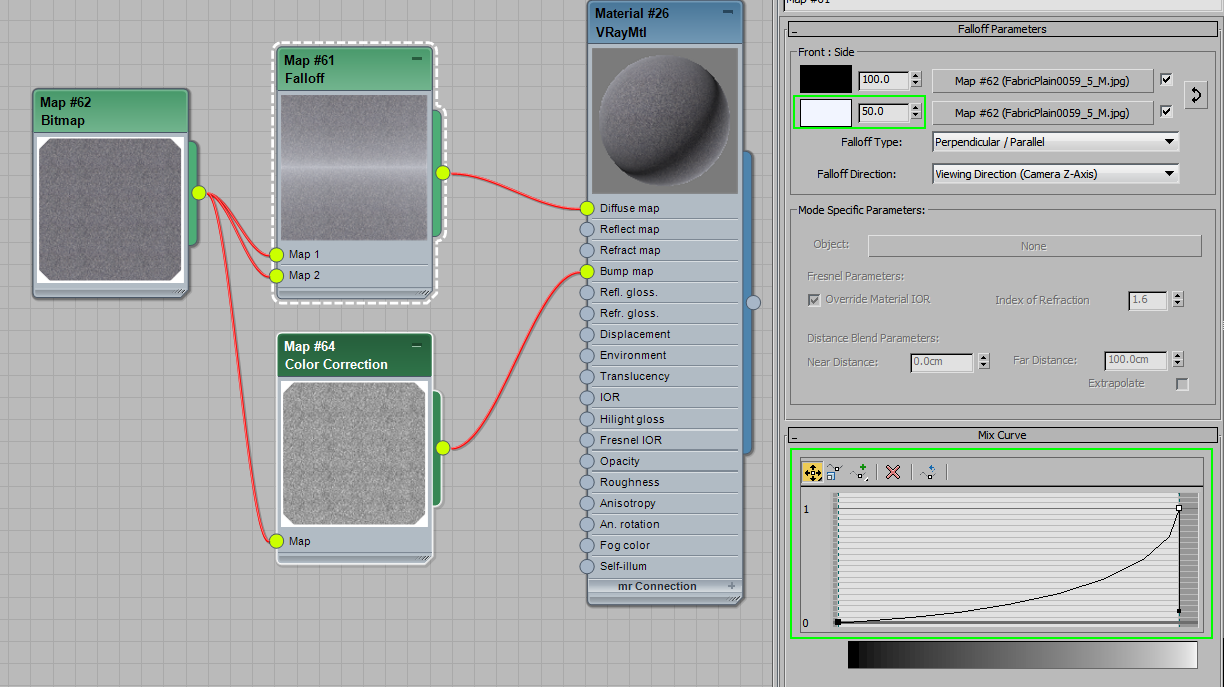

For a rougher look use the Falloff map as a mask and add some speckles in bright color so you get white speckles in the falloff affected areas only. For something like moss or rough fabric, this would be better than just basic falloff.
[/vc_column][vc_column width=”1/2″]

If you set it to world coordinates, you can add some effects to top/bottom or a particular side of the object. For example, things that fall down from above such as rain, snow, and dust would be easy to add by setting the falloff map to world Z axis and adjusting the curve. Here’s an example of Falloff map used to add dust to an object.
[/vc_column][vc_column width=”1/2″]

If you combine it with other masks, like VrayDirt, you can make the dust effect only on the upwards facing parts of the object. Dust in hard to clean corners of an object adds to realism while giving and aged, but cleaned look.
[/vc_column][vc_column width=”1/2″]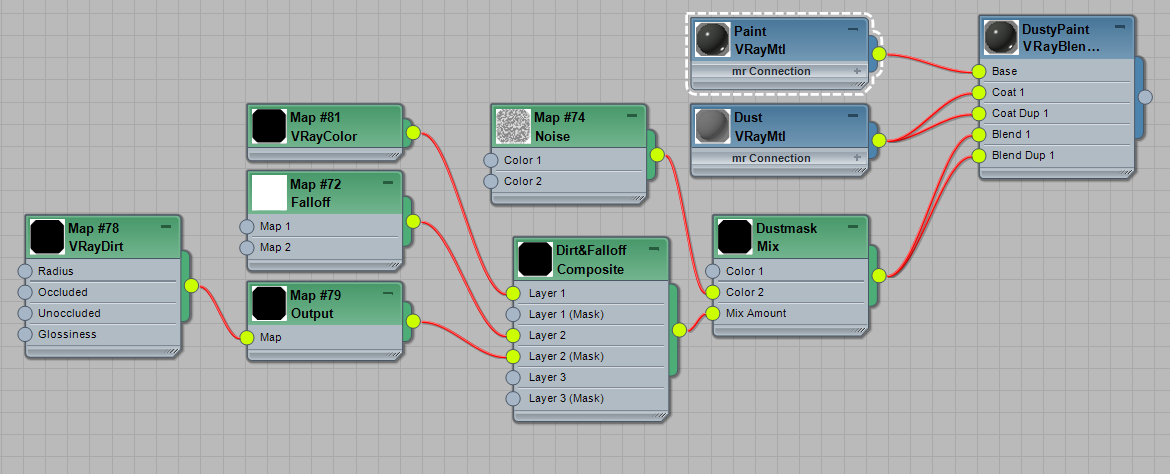

Tension Map
An external plugin called Tension Modifier is needed to produce these maps. Excellent for generating the maps for adding specific effects to concave or convex parts of your model.
It generates the map as a Vertex Color map, so the quality is depending on the amount of vertices in the object. If it is very low poly, add Turbosmooth or Subdivide modifier to get more vertices. If you bake the maps out, you can remove the modifiers afterwards.
Generally you adjust 3 parameters to control the map: intensity, exponent and blur. See the video to learn how to use them.
[/vc_column][vc_column width=”1/2″][/vc_column][/vc_row][vc_row][vc_column width=”1/2″]
Once you are happy with the look, you can set up a vertex color map in the material editor and choose the correct channel to use it like any other regular map.
Concavity maps are similar to VrayDirt. Sometimes it covers the larger open concave areas that VrayDirt does not. Sometimes VrayDirt can get into tight areas the Concavity map may not. It can be useful for adding patina to objects. In the example VrayDirt is combined through a composite map. Then using an Output map contrast is added. The resulting map is used to add a darker color patina to the shader.
[/vc_column][vc_column width=”1/2″]

Convexity maps would be good for giving recessed/convex areas different properties than the main material like more worn or more polished.
If you want to take make a cast iron shader’s convex areas smoother and more polished. To do that, take the Reflect map and composite a lighter grey color on top using the Concavity map as a mask. For bump, Ido the same thing with medium grey instead. This would smooth it out and make it more glossy like you can see in the example. To break up the map, you could mix it with some Noise also. The noise map would help give it some natural break up.
[/vc_column][vc_column width=”1/2″]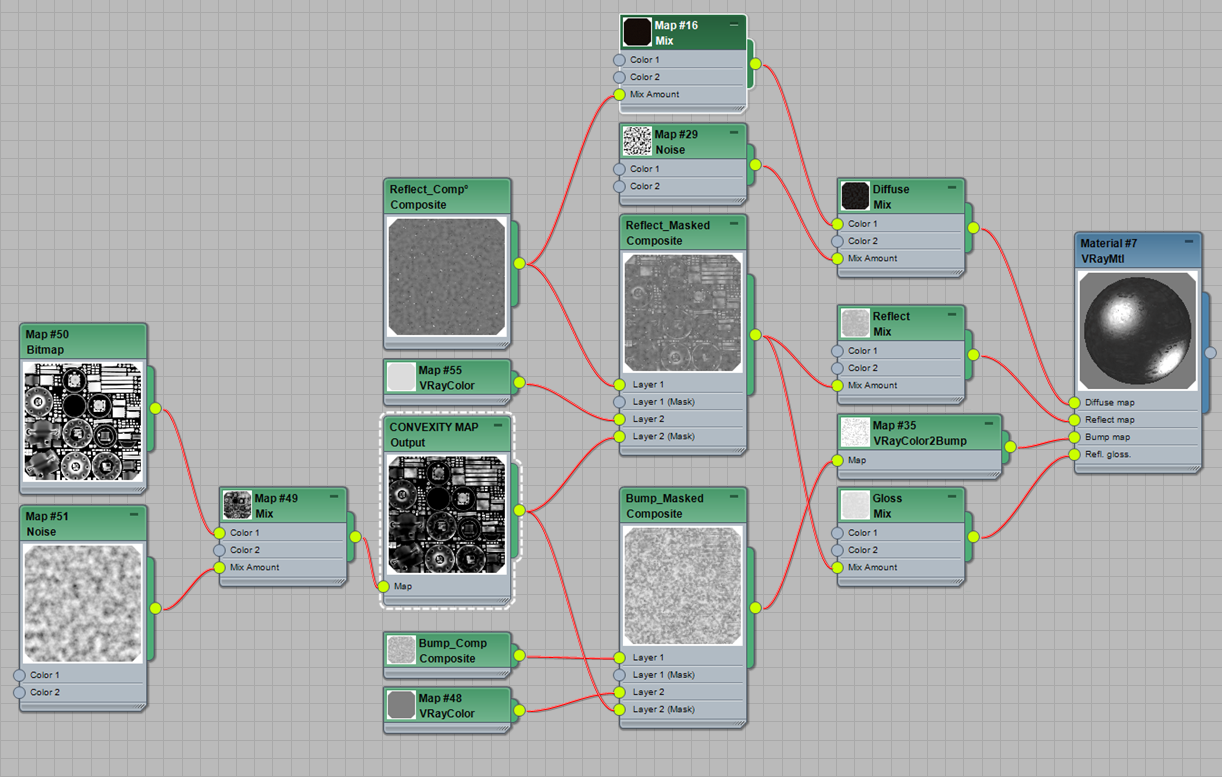

Workflow Example
To understand the workflow better, use some of the techniques covered in this tutorial to create an advanced mask for rusty areas.
[/vc_column][vc_column width=”1/2″][/vc_column][/vc_row]