3D takes a lot of computing power, so we try to use optimization wherever possible to speed up the render process without losing quality. Level of detail is a simple concept that is used to extensively in CG – the more screen space your object takes up, the more detailed it needs to be. Why waste hours rendering a distant high-detail object that is only going to be 10x10px in the rendered image? Although this concept is mostly used for the actual 3d geometry of the model, it is also applicable to the texuring process.
While texturing, you can use various maps that alter or pretend to alter an objects geometry. We’ll cover them in order of decreasing complexity/quality and processing power needed: Displacement, Normal, Bump, Reflection.
[vc_row_inner][vc_column_inner width=”1/2″]
Displacement
Displacement is as able to deliver the most realistic results as it actually changes the objects geometry. Since it is very expensive to render, we usually want to use it only where such detailed results are absolutely necessary – i.e. the rendered object is seen up close and it’s silhouette needs to be altered to look realistic. In this example you can see where we might use a displacement map instead of other methods. The outline or silhouette of the rocks is changed quite a bit, so using a simple bump or normal map would not give us a good result.
[/vc_column_inner][vc_column_inner width=”1/2″]

Normal
Normal map is next in terms of quality. Since it uses color information from all 3 RGB channels, the results are more accurate and detailed then a regular bump map. It comes with a very slight increase in rendertime, it is not significant enough to be concerned about. The main disadvantage though is the time added ot the workflow and the difficulty of adjusting the normal map if something is not right. You have to always keep a b&w source file of the normal map that can be easily modified and convert it to a normal map whenever you make some changes. This one extra step after each adjustment makes it quite a bit slower than working directly with a grayscale bump map.
[/vc_column_inner][/vc_row_inner][vc_row_inner][vc_column_inner width=”1/2″]
A simple general guidline on when to use normal vs bump would be trying a simple bump map first (faster) and if the results do not quite look as realistic or detailed as you need them, convert the bump map to normal for an improvement. Usually this is the case in closeups, that do not require a change to the silhouette or when a strong bump value is needed.
For example, you could use a normal map for a closeup of this coin. The detailed bump effect is very important for a realistic look, but there is no need to change the outline of the object.
If the same coin was used as a prop some where in the background, a simple bump map will usually be enough.
[/vc_column_inner][vc_column_inner width=”1/2″]

Bump
Bump is your regular workhorse, it gets the job done most of the time and only needs to be replaced or upgraded when it can’t handle the task. You would use it probably for 90% of the time on objects that are within medium to far viewing range and do not require silhouette changes. It is fast and the textures are easy to modify. It is the best solution when only subtle detail is needed.
[/vc_column_inner][/vc_row_inner][vc_row_inner][vc_column_inner width=”1/2″]
Reflect
Reflection and glossiness can also play their role in simulating a surface bumpiness. They do in fact replace very small scale bump like matte finish (wich is essentialy a surface roughness on a very small scale) or brushed finish (again, very small scale scratches going in a single direction). In these cases it is not worth using other methods of making that effect. The Reflection and Glossiness are a much more efficient method for simulating it.
Here is a comparison of bump and reflect maps used to achieve a brushed metal look. As you can see, the reflect map actually looks more detailed and smooth when used for this microscopic level of detail.
[/vc_column_inner][vc_column_inner width=”1/2″]
Balancing the LOD in a Scene
Most of the time, you are probably working on scenes where you have a couple of main angles to render. This means that some objects are closer to the camera and take up a larger perecentage of the image and some are further away in the background and are not as visible. Even if you are working with animations and moving cameras, there are still foreground and background objects.
To make the renders as efficient as possible, you must balance the level of detail between the objects in the scene. If everything is set up just right, you can get the fastest possible render speed, while still keeping the same level of visible quality.
This means using the correct type and size of texture for each object. Large foreground object might need displacement to look perfect, while smaller foreground objects can use simple normal maps instead. The background objects most of the time can get away with just a Bump map. The texture size and amount of detail in it also changes as the objects get further away from camera. You can use smaller resolution and less detailed textures for the background objects. Since they will be smaller on the rendered image, the tiny details would be lost anyway.
[/vc_column_inner][/vc_row_inner][vc_row_inner][vc_column_inner width=”1/2″]In this example of a Tree model, the trunk is split up into 3 material IDs . The main trunk has Displacement for detailed bark texture. The larger branches use a normal map and the small twigs have just some simple bump. When rendered, the level of detail seems about the same, the smaller branches do not look noticeably worse than the displaced trunk, but render much faster.
It is easy to just throw maximum amount of detail at all objects and get a good looking result, but optimizing a scene is a bit harder. The savings in rendertime can be worth it, though.
[/vc_column_inner][vc_column_inner width=”1/2″]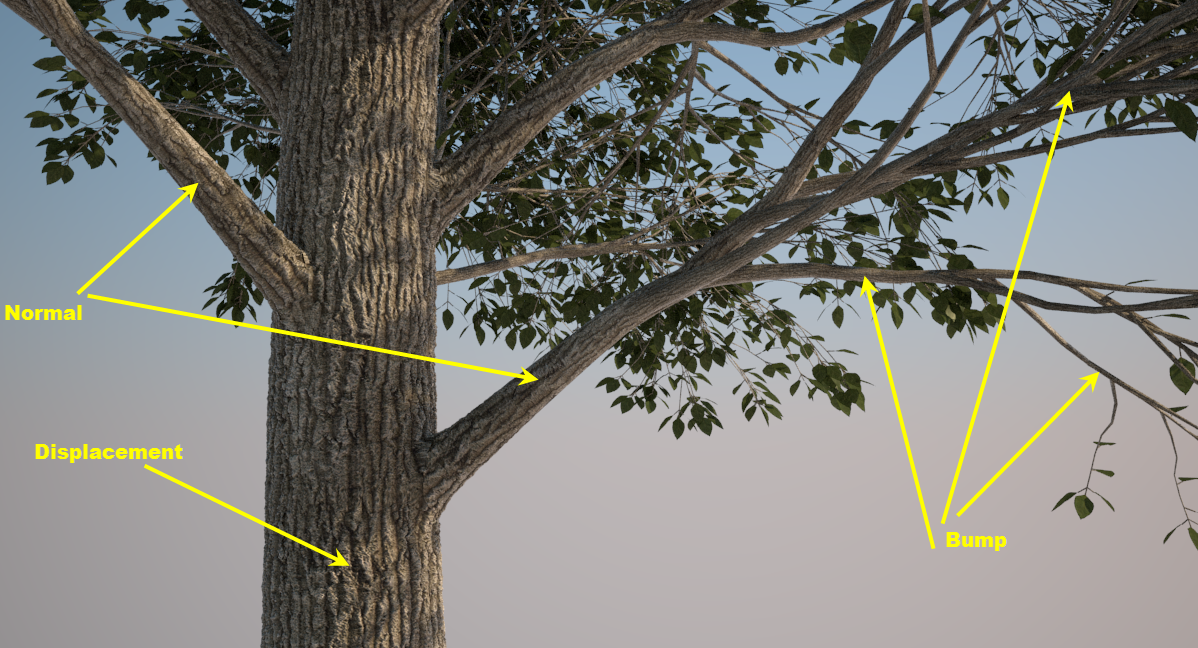
Even if you are not worried about rendertimes, make sure you have enough detail for the closeups in the foreground. A common mistake is to use the same medium amount of detail for the whole scene and get low-res low-quality look for the objects closer to the camera. In the first example, the foreground tree looks too blurry and the trunk is too smooth.
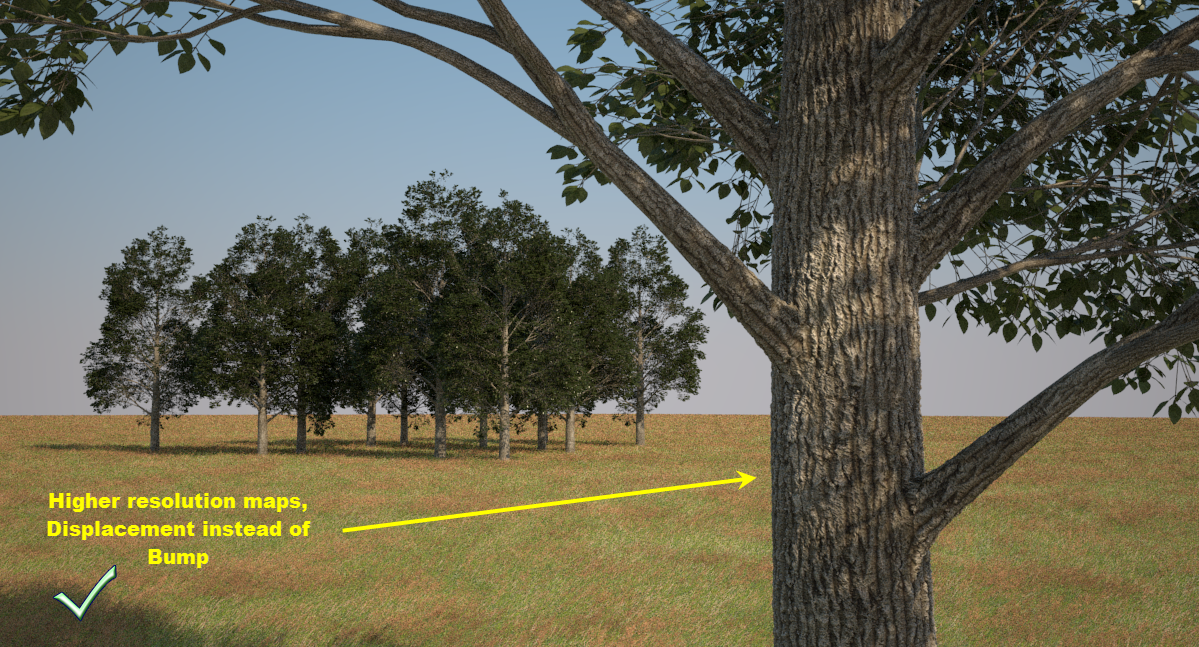
In the second example is the same scene with higher resolution maps used for the foreground tree and the basic bump map replaced with Displacement and Normal. The level of detail between the objects is balanced much better than before.
[/vc_column_inner][vc_column_inner width=”1/2″]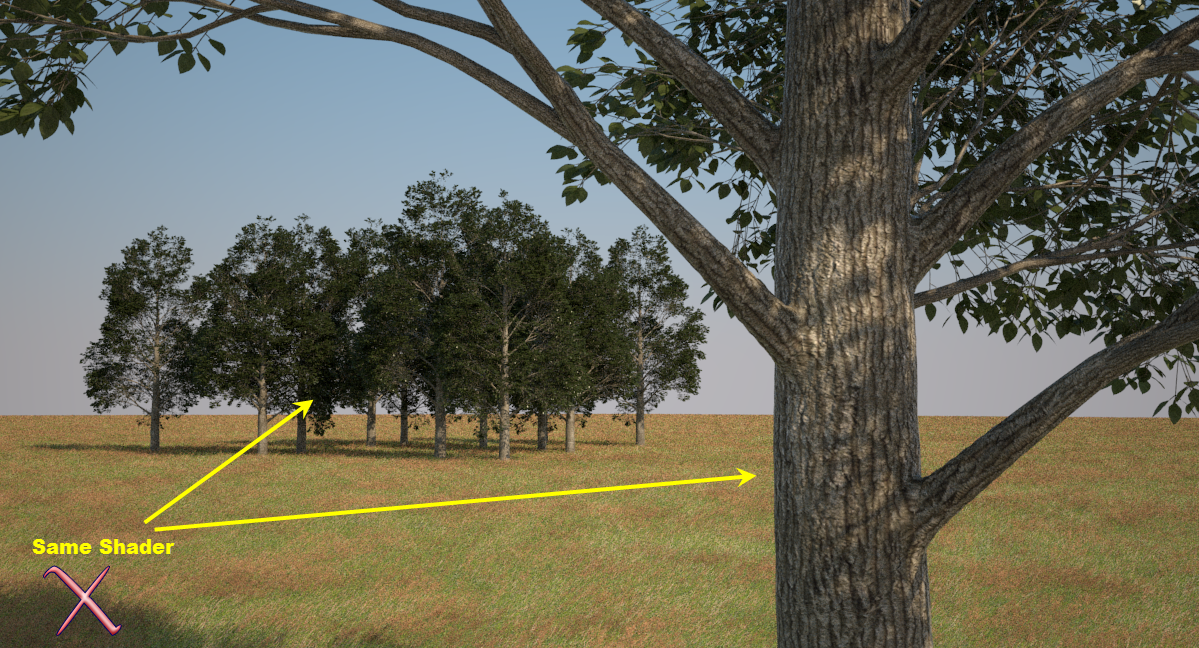
Texture scale and proportion
A common mistake in texturing is using incorrectly scaled textures. Everything should have a realistic, believable size. The best way to achieve this is by checking with reference photos of actual real world objects. Especially, if the thing you are texturing is not something you have seen in real life yourself.
[/vc_column_inner][/vc_row_inner][vc_row_inner][vc_column_inner width=”1/2″]A common example is incorrectly scaled wood texture – the grain is too large or small. There can be some differences between fast growing and slow growing trees, but you should stick to something that looks about average. Compare the three examples to see the difference between correct and incorrect scale.
Textures should also be proportional when used on different size objects, for example, wood grain on a small wooden mousetrap should be approximately the same size as for the wooden nightstand when they are put next to each other. This makes the tiling on the mousetrap much lower than the nightstand and gives viewer a sense of scale. Most people intuitivly know that something is wrong when something is scaled too large or small, even if it is difficult to tell exactly what the problem is.
[/vc_column_inner][vc_column_inner width=”1/2″]

If getting the correct scale is difficult, you can create a reference object in your 3d scene. This is especially helpful if you know the real world size of the texture you are using. For example, if you have a texture of a brick wall and you know the size of the brick. Make a reference rectangle sized 25×6.5 and use it to scale the texture up or down until the bricks match the size of the reference.
Even if you do not know the exact size of the texture sample, you can try to make it close.
[/vc_column_inner][vc_column_inner width=”1/2″]